Mastering smartphone security, especially navigating the intricate process of unlock or bypass FRP Google Pixel 6 sans a PC, showcases adaptability and ingenuity.
In this intuitive guide, we climb up on an inventive journey, transcending the ordinary by providing a unique solution that empowers you to overcome FRP hurdles creatively.
Whether you’re grappling with forgotten credentials or venturing into ownership of a pre-owned Pixel 6, prepare to explore an unconventional yet effective method to unlock or bypass FRP on the Google Pixel 6.
Read More: How To FRP Bypass Google Pixel 5A Or Unlock Phone Without PC
What is the FRP Lock?
The Factory Reset Protection (FRP) lock is a robust security feature embedded within Android devices, serving as a digital sentinel to deter unauthorized access.
When enabled, the FRP lock requires the user to verify their Google account credentials after a factory reset or device setup, adding an additional layer of protection against potential intruders.
This ingenious safeguard ensures that only the rightful owner can access and reclaim their device, fortifying the fort of smartphone security.
Why Bypass FRP on Google Pixel 6
Bypassing FRP on a Google Pixel 6 becomes a necessity when the digital puzzle of one’s forgotten credentials poses a formidable barricade to device access. In such predicaments, circumventing the Factory Reset Protection empowers users to regain control of their devices.
Allowing them to repurpose, reconfigure, or resuscitate their Pixel 6 without the frustrating shackles of forgotten login information.
This creative solution is a lifeline for those in need, offering the chance to salvage their smartphone experience from the clutches of authentication amnesia.
Unlock or Bypass FRP Google Pixel 6 Without a PC: 2024 Step-by-Step Solution

Requirements to Unlock/Bypass FRP Lock
- Keep the phone charged by at least 60% or 80% to complete the bypass Google account verification on the Google Pixel 6 Android 12 phone working on time.
- Unlock or bypass FRP Google Pixel 6 without a PC method depends a lot on the internet connection and speed, so try to keep the internet connection and speed good.
- Your mobile data will be lost to complete the Google Pixel 6 Android 12 Google account unlock without a PC/SIM card. So make sure to backup the necessary data.
- You must download FRP bypass tools or FRP bypass apk to bypass FRP or unlock phone Google Pixel phone 6 without the computer.
Step by Step Instruction:
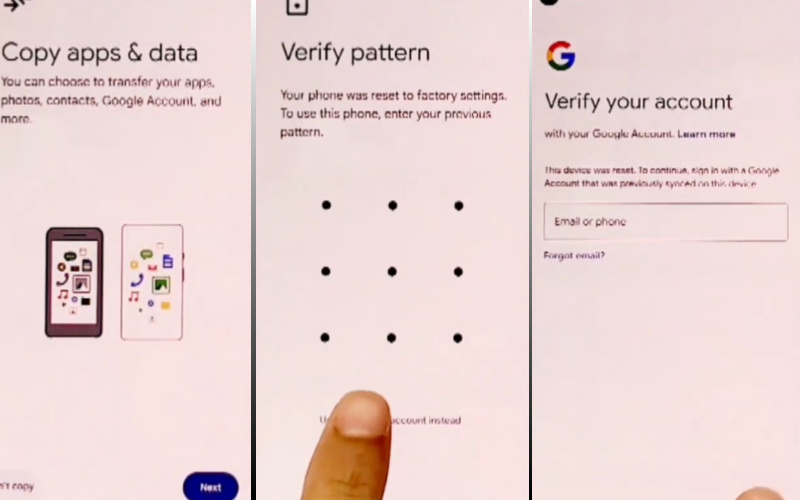
- Step 1: At the beginning, turn on your Google Pixel 6 Android 12 phone, then you will see the “Welcome to your Pixel” screen, click on “Get Started” here. Click to go through the initial steps “Connect to mobile network>Skip>Connect to Wi-Fi.”
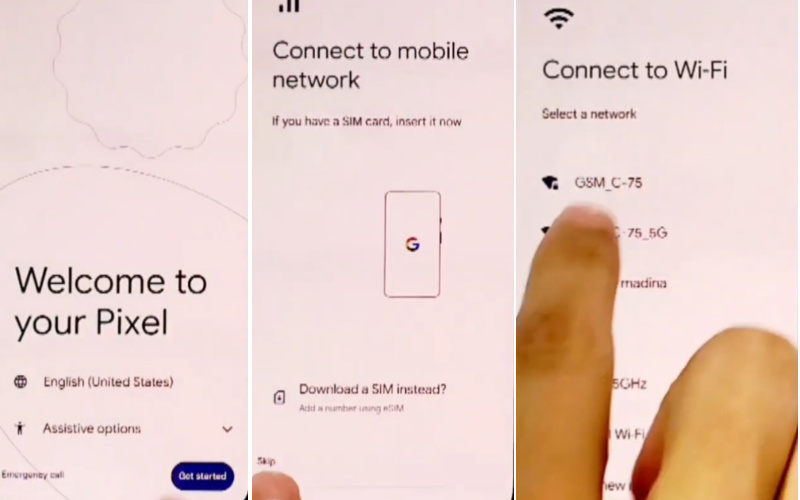
- Step 2: Keep clicking for more basic steps “Copy apps & data>Don’t copy>Verify pattern>Use my Google account instead>Verify your account.”
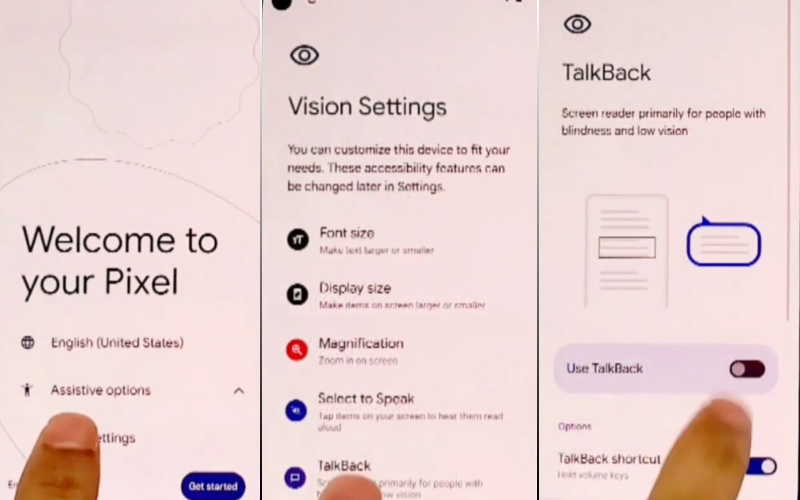
- Step 3: Open the 1st step, click the “Vision settings” option, and get the “TalkBack” page to enable the “Use TalkBack.”
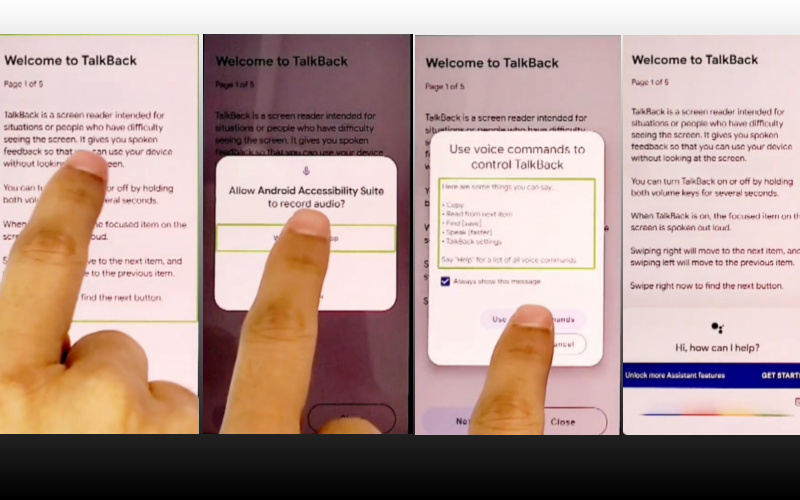
- Step 4: Now comes the “Welcome to TalkBack” page here draw the “Reverse L” and click “While using the app.” Then click “Use voice commands” and say “Google Assistant” to open the “YouTube.”
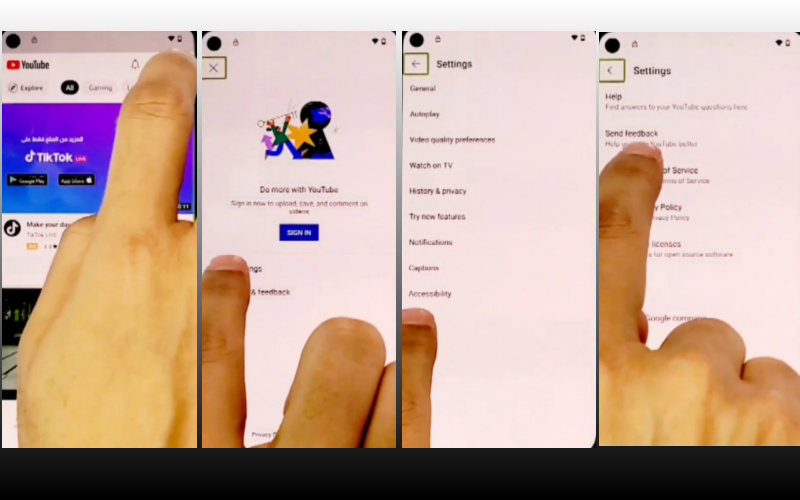
- Step 5: See YouTube’s right corner and click serially “User icon>Settings>About>YouTube terms of service.”
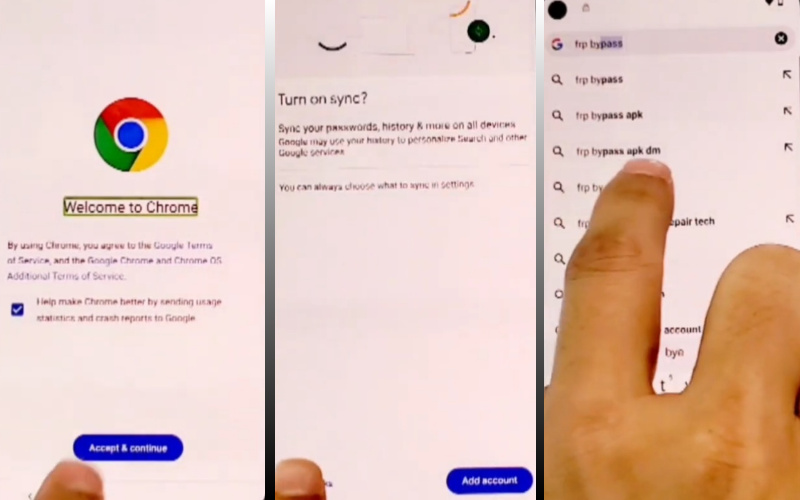
- Step 6: In the next step go to the “Welcome to Chrome” option and click “Accept & Continue.” Now get the “Turn on sync?” option and click “No thanks” then write “YouTube” search bar “frp bypass apk dm” then open it.
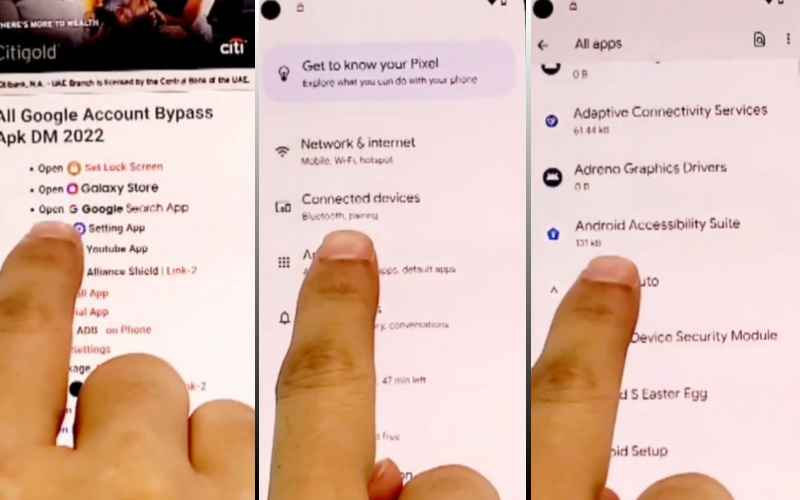
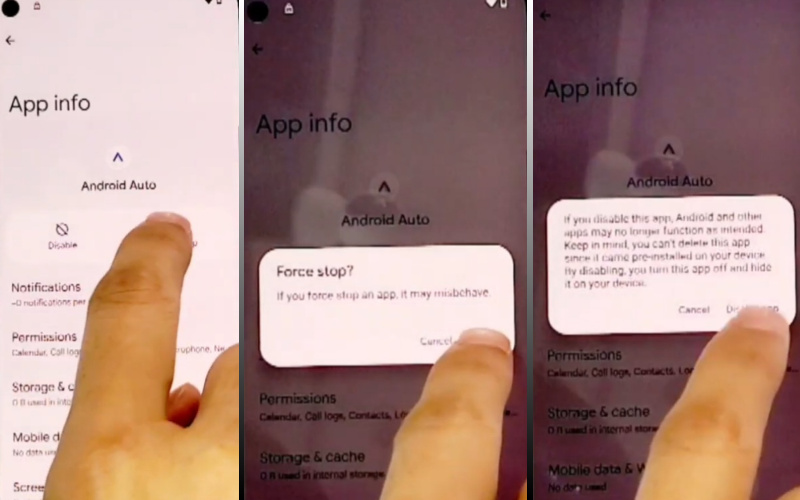
- Step 7: Look up to open “Settings apps” and click continue “Apps>Android auto>Force stop>OK>Disable>Disable app.”
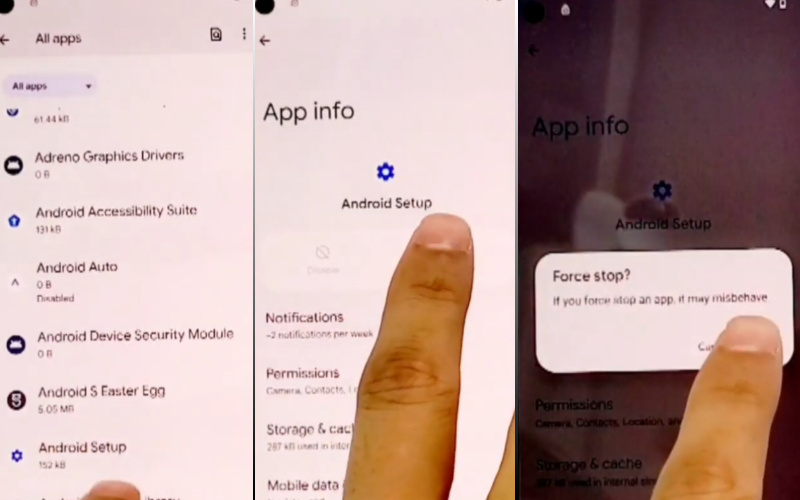
- Step 8: For Android setup click step-by-step “Android setup>Force step>OK.”
- Step 9: For the Android system click “Android system>Force step>OK.”
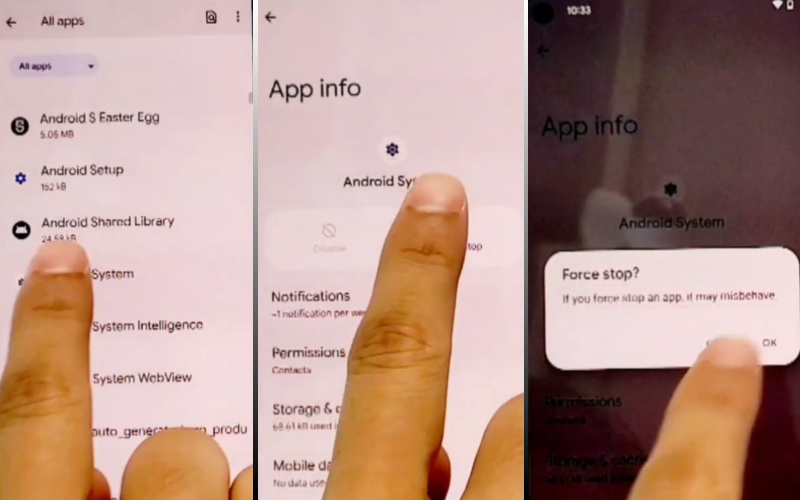
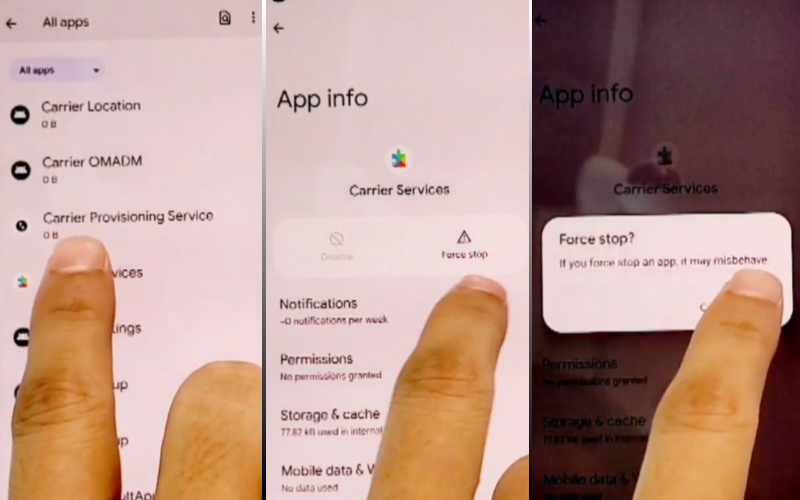
- Step 10: For the Carrier services click “Carrier services>Force stop>OK.”
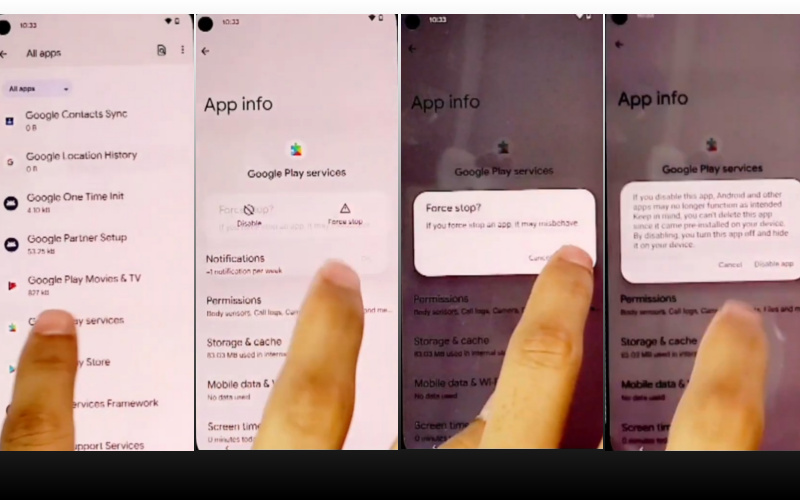
- Step 11: For the Google Play services click “Google Play services>Force stop>OK>Disable>Disable app.”
- Step 12: For the Google Play Store click “Google Play store>Force stop>OK>Disable>Disable app” here respectively.
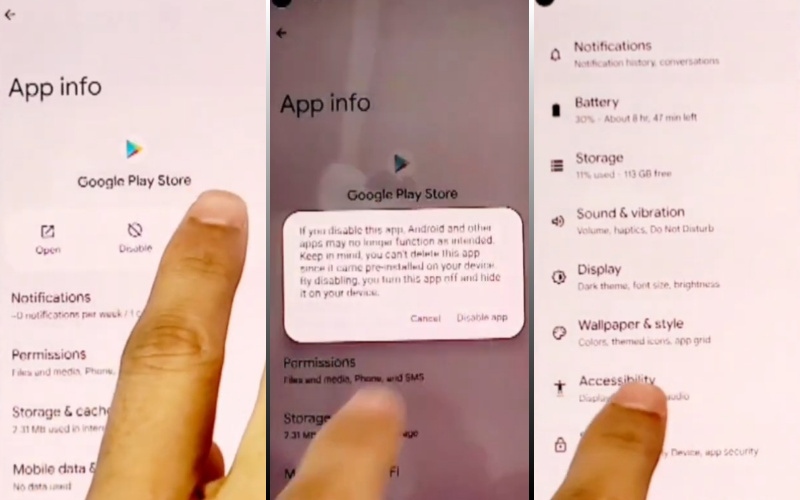
- Step 13: Tap back to click on the “Accessibility>Accessibility menu>Accessibility menu shortcut>Allow>Got it” option.
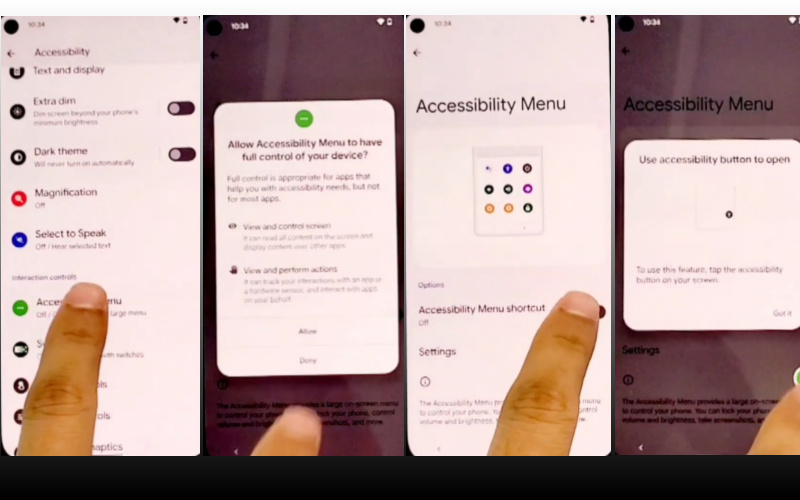
- Step 14: Now again return 1st step “Welcome to your Pixel>Connect to mobile network>Skip>Copy apps & data>Don’t copy.”
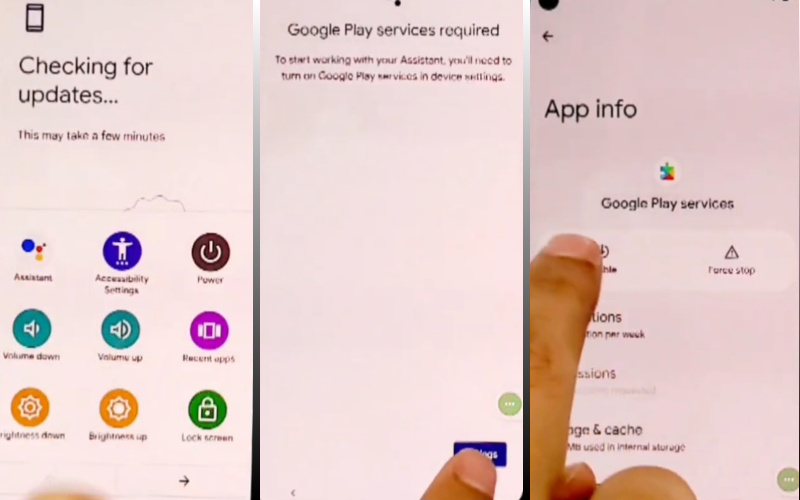
- Step 15: After the above step click the “Assistant” option 2/3 times until reach the “Keyboard Icon” then click it. Get here “Google Play Services Required” page and click “Settings” then open”Google Play Services” and disable it.
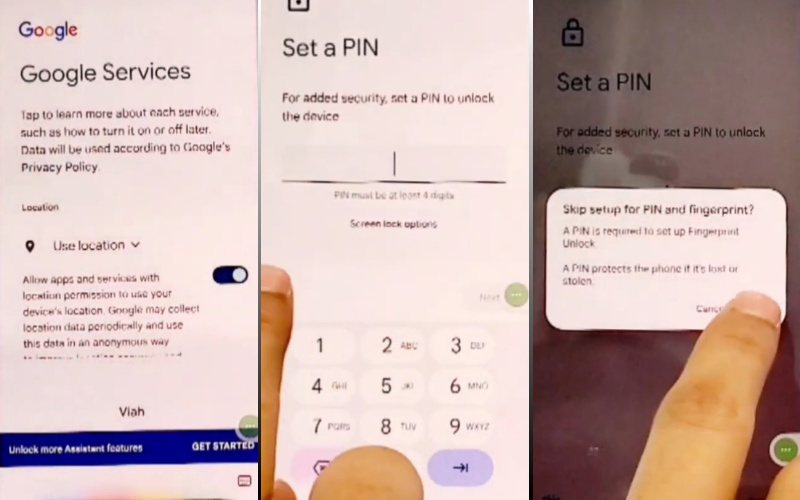
- Step 16: Click on the next steps sequentially to achieve the goal “Google Services>More and Continue>Set a PIN>Skip>Skip setup for PIN and fingerprint>Skip.”
- Step 17: We reached the final stage here click “Save battery with dark theme>Next>Swipe to navigate your phone>Skip>All set!”
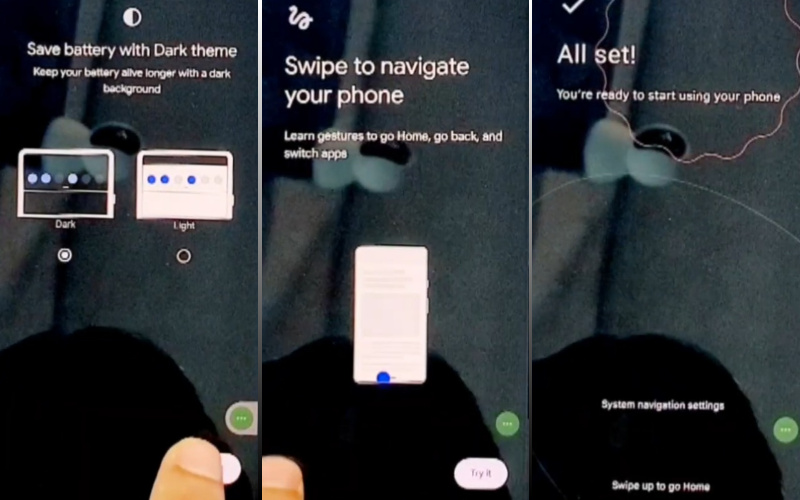
Finally, your FRP bypass method successfully completed without any hassle.
Another Easy Solution
Now, let’s delve into the step-by-step process of unlocking or bypassing FRP on your Google Pixel 6 without a PC.
- Step 1: Begin by activating your Google Pixel 6 and linking it to a reliable Wi-Fi network.
- Step 2: Proceed with the initial device configuration by selecting your preferred language and connecting to a Wi-Fi network. When asked to confirm your Google account, adhere to these guidelines.
- Step 3: Enter Google credentials, tap “Email or Phone,” and input your email.
- Step 4: Press and sustain the “@” symbol on the keyboard to unveil additional options. Opt for “Google Keyboard Settings.”
- Step 5: Within Google Keyboard Settings, choose “Text correction.”
- Step 6: Within the Text correction submenu, tap “Personal dictionary.”
- Step 7: Pick the language employed on your device.
- Step 8: Touch the “+” symbol to insert a new term.
- Step 9: In the “Add a word” box, input any infrequent word or phrase, such as “Zephyranthes.”
- Step 10: Press “Save” to append the word to your personal dictionary.
- Step 11: Revert to the initial setup screen and tap the “Email or Phone” area.
- Step 12: Input the term “Zephyranthes” (or your chosen word) and hit the spacebar.
- Step 13: Without being prompted for your Google account credentials, you’ll progress to the subsequent setup screen. Adhere to the on-screen directives to finalize the device setup.
Congratulations! You’ve successfully unlocked or bypassed FRP on your Google Pixel 6 without the need for a PC. Enjoy your Google Pixel 6 without the FRP hurdle, and keep your device safe and secure.
How to Unlock or Bypass FRP Google Pixel 6 Free
Unlocking or bypassing Factory Reset Protection (FRP) on a Google Pixel 6 for free is a task that requires both technical know-how and creativity. Here’s a step-by-step guide to achieving this:
Requirements:
- Need a computer with internet access
- A USB cable
- A SIM card with a PIN.
Step-by-Step Instruction
Step 1: Begin by performing a Start-Up Wizard bypass.
Step 2: Connect to a Wi-Fi network and reach the screen for Google account info.
Step 3: Utilize accessibility features like TalkBack to navigate the setup screens.
Step 4: Activate TalkBack and access its settings creatively.
Step 5: Disable TalkBack through a series of swipes and taps.
Step 6: Navigate back to the “Welcome” screen.
Step 7: Select “Access to my Assistant” and open the Google app.
Step 8: Search for “Settings” in the Google app and open it.
Step 9: Scroll down to “System” and choose “Backup.”
Step 10: Opt for a device reset to reach the Factory Data Reset screen.
Step 11: Initiate a factory reset to restart the Pixel 6 without the previous Google account.
Step 12: Complete the initial setup by selecting language, connecting to Wi-Fi, and setting up your Google account, or skip this step for account-free usage.
By skillfully navigating the accessibility features and the device’s settings, you’ve successfully unlock or bypass FRP Google Pixel 6 for free.
Specification of Google Pixel 6 Android 12 Device
- Display: Witness the brilliance of a vast 6.4-inch, lively OLED display boasting a stunning resolution of 1080 x 2400 pixels and a silky-smooth 90Hz refresh rate, ensuring unparalleled responsiveness.
- Processor: Powering this marvel is Google’s inaugural custom-designed chip, the Tensor, meticulously crafted for swift and efficient performance, particularly in tasks encompassing machine learning and artificial intelligence.
- Storage: Accompanied by a generous 8GB of RAM, effortlessly juggle multiple applications simultaneously. Opt for either 128GB or 256GB of storage to accommodate your multimedia treasures and applications.
- Camera: Capture breathtaking detail with the dynamic dual-camera setup, flaunting a formidable 50MP primary sensor alongside a 12MP ultrawide sensor for sweeping landscapes and group portraits.
- Selfie camera: Revel in crystal-clear selfies and video calls courtesy of the 8MP front-facing camera.
- Battery: Sustaining your adventures is a robust 4614mAh battery, promising up to 24 hours of uninterrupted usage.
- OS: Seamlessly navigating the latest Android 12 OS, relish a sleek and intuitive interface complemented by guaranteed updates.
- Connectivity: Stay connected with Wi-Fi 6E, Bluetooth 5.2, NFC, and a USB-C port, facilitating rapid wireless connectivity, device pairing, contactless transactions, and versatile charging and data transfer options.
How to Disable Factory Reset Protection
To disable Factory Reset Protection (FRP) on your Android device, one must tread carefully, for it is a safeguard rooted deep within the annals of your smartphone’s security protocols. Follow these Byzantine steps:
- Navigate to the ‘Settings’ on your device and plunge into the ‘Accounts’ section.
- Ferret out the ‘Google’ account that has been enmeshed in the FRP web, and within its labyrinthine recesses, seek the ‘Remove Account’ option.
- Be prepared to tender your device’s PIN, pattern, or password – a digital handshake signifying your intent to tamper with the FRP citadel.
- You’ll then be bestowed with a rather arcane prompt, beseeching you to confirm your identity with the Google credentials associated with the device. A subtle nod to two-factor authentication may surface here as well.
- With the right incantations, the Google account shall be severed from the clutches of your device, and the FRP should, in theory, cease to hinder any factory reset endeavors.
Bottom Line
In the ever-evolving landscape of smartphone security, mastering the art of unlock or bypass FRP Google Pixel 6 without the need for a PC is a testament to resourcefulness and ingenuity.
This user-friendly, innovative method we’ve explored goes beyond the commonplace solutions, offering a creative twist that empowers you to reclaim access to your device.
So, whether you’ve encountered the forgotten credentials conundrum or are embarking on a new journey with a secondhand Pixel 6, rest assured that this guide has equipped you with a unique and efficient solution to unlock or bypass FRP Google Pixel 6.
People Also Ask
How do I remove a Google account from my Google Pixel 6?
- To extricate a Google account from your Google Pixel 6 with aplomb:
- Navigate to the “Settings” menu, then delve into “Accounts.”
- Subsequently, select the specific Google account you wish to bid adieu to and tap on it.
- From there, a menu will ensue, presenting the option to “Remove account.”
- Exercise due caution, as this will sever the connection between your device and said Google account, potentially affecting app access and data synchronization.
Is it possible to eliminate the Google Factory Reset Protection (FRP) lock?
The Google Factory Reset Protection (FRP) lock is a robust security measure aimed at deterring unauthorized access. Bypassing it without original credentials is challenging. It’s crucial to proceed cautiously, adhere to ethical standards, and seek professional help if needed for FRP-related issues.
How do I append a Google account to my cherished Pixel phone?
- To merge your Pixel phone with Google’s grace.
- Navigate to “Settings” anew.
- Explore “Accounts” and tap “Add account.”
- Choose “Google” when prompted for account type.
- Proceed with on-screen cues to log in or forge a fresh Google account.
- Witness your Pixel adorned with this novel addition.
How do I metamorphose my Google Pixel account?
- To connect your Pixel phone to a Google account and enjoy synchronization, revisit the “Settings” menu.
- Navigate to “Accounts” and select “Add account.”
- Opt for “Google” as the account type.
- Follow on-screen instructions to sign in or establish a new Google account.
- Witness your Pixel phone adorned with this fresh addition for seamless integration.


