Salutations, intrepid digital navigators! Today, we embark on a transformative expedition, deciphering the unlock or bypass FRP Google Pixel 3 XL without the need for the conventional anchor of a PC. In this tapestry of ingenuity, we shall unfurl the secrets to liberate your device, allowing it to breathe freely in the digital realm.
Join us on this distinctive journey where innovation converges with simplicity, offering you a passport to a PC-free FRP liberation experience like never before.
What is the FRP Lock?
The FRP (Factory Reset Protection) lock, a formidable guardian in the digital citadel, stands as a sentinel against unauthorized access to your device. This ingenious security feature, akin to a digital gatekeeper, is triggered when a device undergoes a factory reset. Once engaged, FRP requires the user to verify their identity with the previously synced Google account information, fortifying the fortress against would-be intruders.
In essence, FRP is the vigilant custodian, ensuring that only the rightful possessor can traverse the sacred realms of a freshly reset device, adding an extra layer of safeguard to the digital tapestry.
Read More: How To Bypass FRP Google Pixel Android 10 All Model Phone
Specification of Google Pixel 3 XL Android 9
- Display: Immerse yourself in the sleek symphony of a glass-aluminum fusion, harmonizing durability with a touch of elegance. Boasting a refined 6.3-inch P-OLED display, witness visuals come alive in vivid hues, complemented by a notch that discreetly houses cutting-edge technology.
- Photography Prowess: Embark on a photographic escapade with a 12.2 MP dual-pixel rear camera, a virtuoso in capturing moments in unprecedented detail. Front and center, the dual 8 MP selfie cameras elevate your self-portraits to an art form, introducing a new dimension to your visual storytelling.
- Processing Prowess: Beneath the surface, the Qualcomm Snapdragon 845 chipset orchestrates a digital symphony, seamlessly conducting complex tasks with finesse. Revel in the multitasking ballet facilitated by 4 GB of RAM, ensuring a responsive and fluid user experience.
- Pixel Perfect Software: Savor the unadulterated Android 9 experience with the Pixel 3 XL, guaranteed to receive timely updates and feature enhancements.
- Power and Endurance: The 3430 mAh battery, a stalwart companion, endows the Pixel 3 XL with the stamina to endure your digital sojourns.
- Connectivity Capabilities: Navigate the digital landscape with 4G LTE connectivity, ensuring swift data exchanges and seamless internet surfing. The USB Type-C port stands as a gateway for fast data transfers and a conduit for wired audio experiences.
- Pixel Peripherals: Embrace the water and dust resistance prowess, certified at IP68, safeguarding your device against the elements. Augment your storage horizons with a choice between 64 GB and 128 GB variants, providing ample space for your digital archives.
How to Unlock or Bypass FRP Google Pixel 3 XL Without PC

Requirements to Unlock/Bypass FRP Lock
- Keep the phone charged by at least 60% or 80% to complete the bypass Google verification on Google Pixel 3 XL Android 9 phones working on time.
- The success of your unlock or bypass FRP Google Pixel 3 XL without the computer method depends a lot on the internet connection and speed, so try to keep the internet connection and speed good.
- Your mobile data will be lost to complete the bypass FRP of a Google Pixel 9 phone without a PC. So make sure to backup the necessary data.
- You must download FRP bypass tools or FRP bypass apk to FRP bypass Google Pixel 3 XL without a computer.
Step-by-Step Solution:
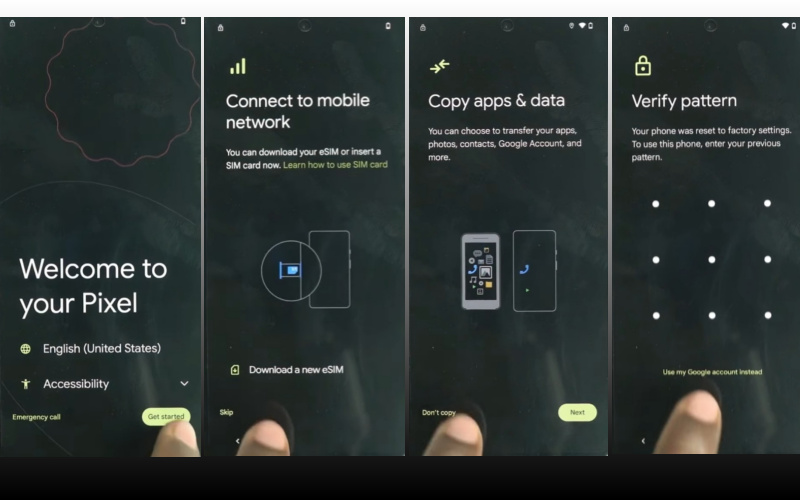
- Step 1: First, need your power on the Google Pixel 3 XL device, with the “Welcome to your Pixel” page and click “Get Started.
- Step 2: Here get some of the primary options and click continue “Connect to Mobile network>Skip>Copy apps & data>Don’t copy>Verify Pattern>Use my Google account instead.”
- Step 3: Now this step gets the “Verify your account” page but it’s locked. Again back and click “Welcome to your Pixel>Connect to Mobile network>Skip>Copy apps & data>Next.
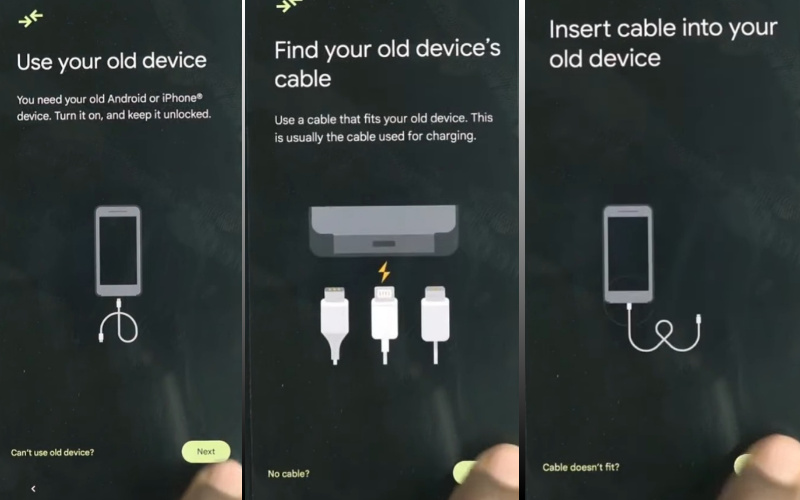
- Step 4: Now follow serially and click continue “Use your old device>Next>Insert the cable into your old device>Next>Connect both devices.”
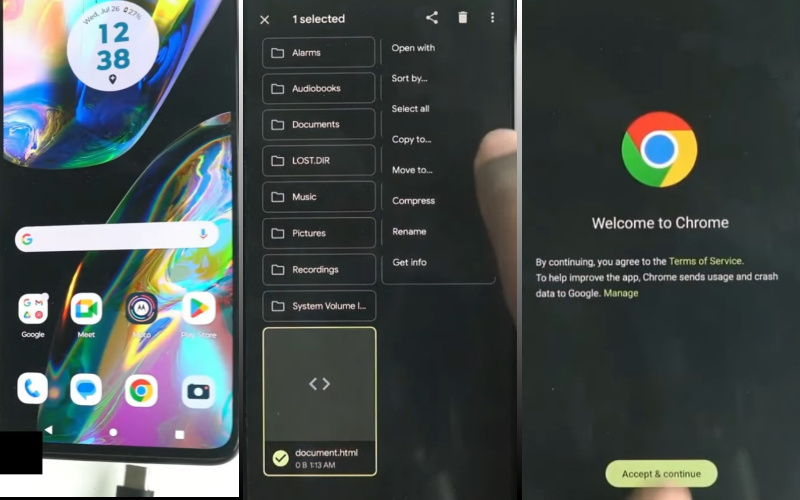
- Step 5: After here connect any Android phone (Without Samsung) to a Google Pixel 3 XL Android 9 device. Then disconnect the phone and use “OTG” to copy-paste any “HTML file.” Collecting the HTML file open it with “Welcome to Chrome.”
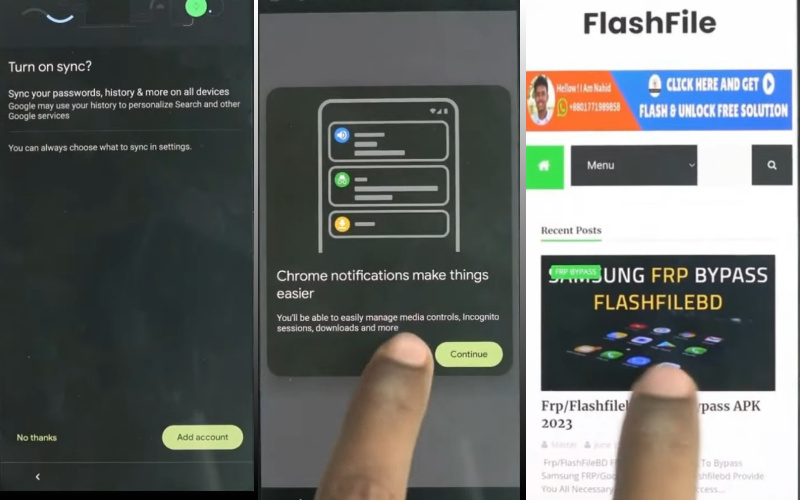
- Step 6: Continue clicking “Chrome>Turn on sync>No thanks>Chrome notification make things easier>No thanks.” Click the Chrome search bar and write “flashfilebd.com” then open it.
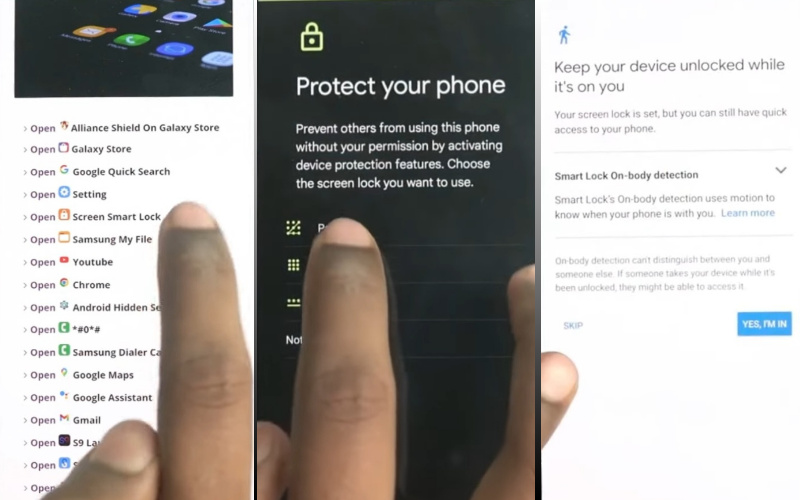
- Step 7: Open and click the “Open screen smart lock” option to Get the “Protech your phone” page here set the screen lock until you reach the “Keep your device unlocked while it’s on you” option then click “Skip.”
- Step 8: Restart your device and wait for complete rebooting. After following step by step “Welcome to your Pixel>Connect to Mobile network>Skip>Copy apps & data>don’t copy.”
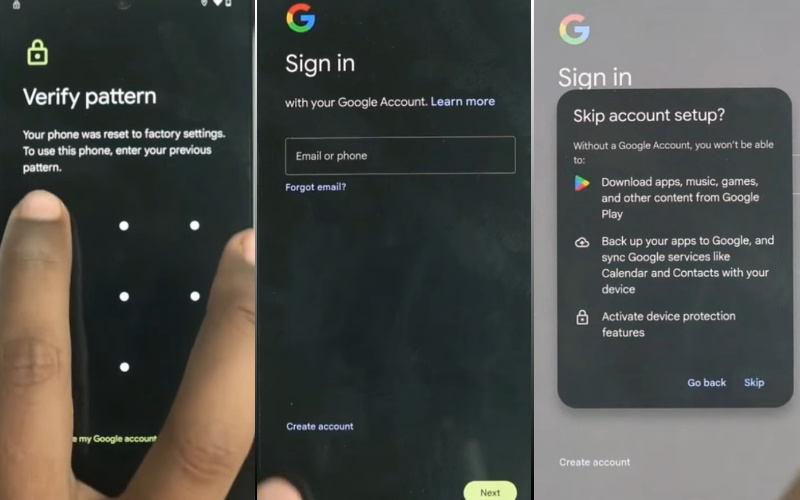
- Step 9: Confirm the “Verify pattern” page and draw your “Pattern lock” to open it then click one by one “Google Sign in>Skip account setup>Skip>Google service>More & accept>limited warranty>Next.”
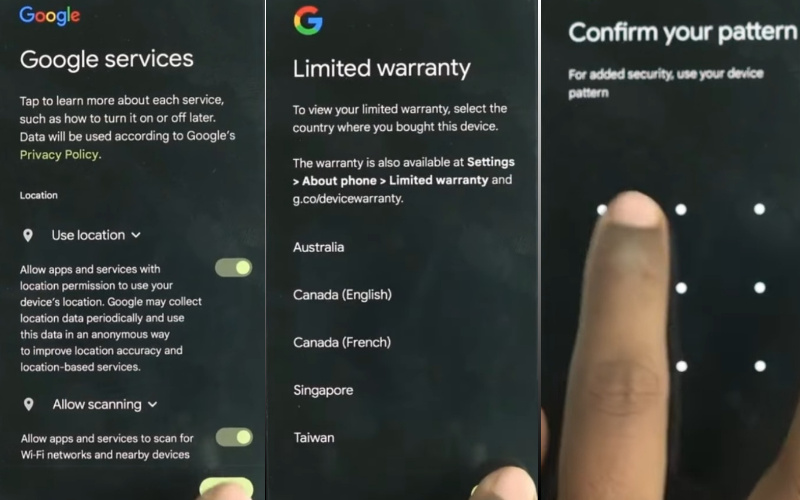
- Step 10: Again here unlock your pattern lock and then click serially “Setup fingerprint unlock>More & I agree>How to set up your fingerprint>Do it later>Skip anyway.”
- Step 11: Finally you stay in the last stage and click “Set up face unlock>Next>How to set up face unlock>Next>Swipe to navigate>Skip>All set.”
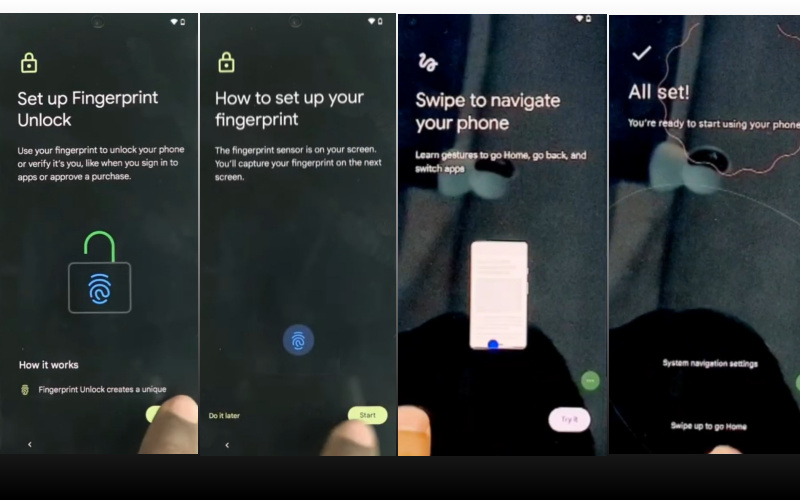
That means you unlock or FRP bypass Google Pixel 3 XL Android 9 without the PC process being completed successfully.
Additional Easy Solution
- Step 1: Upon powering up your Pixel 3 XL, traverse through the setup process until you reach the “Welcome” screen. Here, the magic begins.
- Step 2: In the spirit of avant-garde tactics, enable TalkBack, an accessibility feature that turns spoken feedback on your device.
- Step 3: Triple-tap the screen with two fingers to activate TalkBack.
- Step 4: Navigate to “Global Context Menu” by swiping down and right simultaneously, then select “TalkBack Settings.”
- Step 5: Disable TalkBack by pressing both volume keys simultaneously.
- Step 6: Conduct a choreography of screen gestures to unlock new possibilities.
- Step 7: Swipe down and right to open the “Global Context Menu.”
- Step 8: Tap “TalkBack Settings” once more.
- Step 9: Press and hold both volume keys simultaneously, then tap “OK” when prompted.
- Step 10: In your quest for liberation, scroll down and select “Help & Feedback” from the list.
- Step 11: Tap “Use Morse Code” and enable it.
- Step 12: Input a string of Morse Code by tapping and holding the screen with two fingers.
- Step 13: In the Morse Code input field, deliver the secret message: “UnlockFRPWithCode.”
- Step 14: With the FRP barrier shattered, revel in your triumph as you navigate through the unlocked realm of your Google Pixel 3 XL.
Congratulations, valiant tech explorer! You’ve successfully bypassed FRP on your Google Pixel 3 XL sans the shackles of a PC. May your device now be a beacon of unrestricted access!
How to Disable Factory Reset Protection (FRP)
Certainly! Let’s embark on a step-by-step journey to disable Factory Reset Protection (FRP) with finesse:
- Like a digital cartographer, chart a course to the device’s “Settings.” This sacred space holds the keys to the FRP kingdom.
- Within the “Settings” realm, seek out the fortress of security settings. Here, the FRP protocol lies in wait.
- Navigate through the security labyrinth until you unearth the treasure trove known as “Google Settings.” It’s here that FRP reveals its digital secrets.
- Within the “Google Settings,” engage in a dance with the “Device Administrators” option. Here, FRP stands as a silent sentinel.
- Locate the mystical “Find My Device” option, and with a decisive tap, disable its enchantment. This is a key step in the intricate ritual.
- Exit the “Google Settings” sanctuary and gracefully return to the broader realm of “Security Settings.” FRP’s grip is gradually loosening.
- Within the security realm, find the sacred ground of “Screen Lock.” This is where the final incantations against FRP shall be whispered.
- In a symbolic act of digital rebirth, opt for a new screen lock method. This is the culmination of the ritual, signaling the restructuring of your device’s security foundations.
- Seal the pact by confirming your new screen lock method. With this, FRP’s vigilant watch is officially disabled. Rejoice in the newfound freedom your device now enjoys.
Final Word
As we draw the curtains on this odyssey of liberation, rejoice in the triumph of your Google Pixel 3 XL Android 9 emancipation from FRP captivity, achieved with a flair for finesse and an absence of the conventional digital accomplice, the PC. Your journey, adorned with whimsical screen gestures and Morse Code sonatas, has transformed your device into a beacon of inventive freedom.
May your Pixel now navigate the digital seas unencumbered, a testament to the harmonious marriage of creativity and simplicity in the quest to unlock or bypass FRP without the tethering constraints of a PC. Cheers to your newfound digital autonomy!

