Bypass Google verification OPPO Find N2 Flip without PC might seem like a complex puzzle, but fear not I have come up with a solution for it! We’ll delve into the creative and ingenious ways to bypass Google verification on your OPPO Find N2 Flip without relying on a computer.
We understand that this process can be tricky, but we’re here to make it as straightforward as a walk in the park. By the end of this guide, you’ll have the knowledge you need to regain access to your OPPO Find N2 Flip without the hassle of using a PC.
So, start the process and uncover the secrets to bypass Google verification OPPO Find N2 Flip!
How to Bypass Google Verification OPPO Find N2 Flip Without PC

Now here we will discuss how to bypass Google verification OPPO Find N2 Flip without using a computer. If you follow the procedure carefully and patiently, you will get success easily.
Requirements:
- Keep the phone charged by at least 60% or 80% to complete the bypass Google account verification on Android phone OPPO Find N2 Flip devices working on time.
- The success of your bypass Google verification OPPO Find N2 Flip without the computer method depends a lot on the internet connection and speed, so try to keep the internet connection and speed good.
- Your mobile data will be lost to complete the bypass Google verification OPPO Find N2 Flip without a PC. So make sure to backup the necessary data.
- You must download FRP bypass tools or FRP bypass apk to bypass Google verification OPPO Find N2 Flip without a computer.
Step by step instruction:
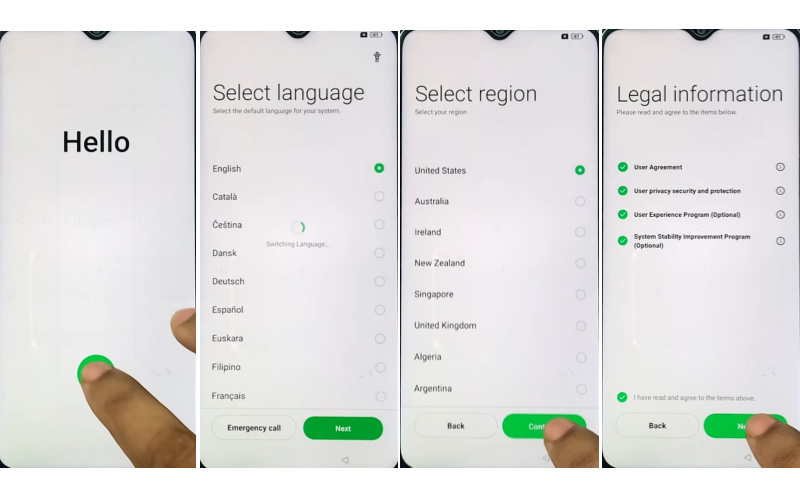
- Step 1: Turn on the device and click the “Start icon” on the “Hello” screen.
- Step 2: Select “language and region”, then click “Continue.”
- Step 3: Proceed through “Legal information” by clicking “Next.”
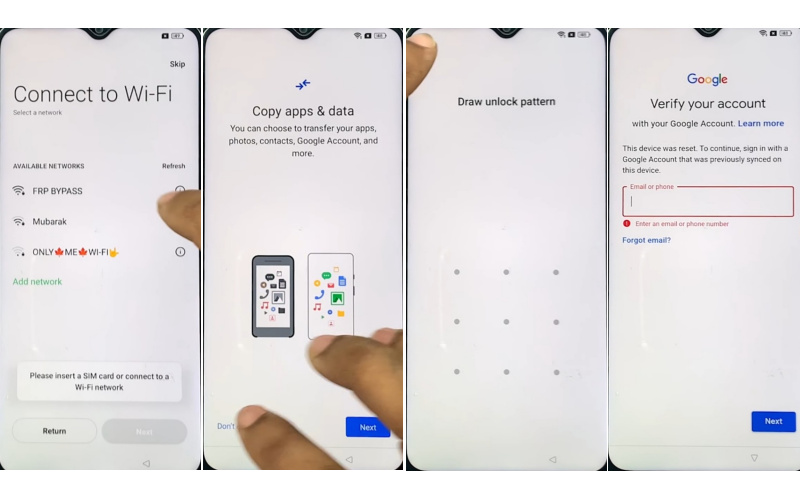
- Step 4: Set up your “WiFi network” with mobile then click “Next.”
- Step 5: Next, reach the “Copy apps & data” page and click “Don’t copy.”
- Step 6: Now present the “Pattern lock” page and click “Cancel.”
- Step 7: You can see the “Google verify your account” page but it’s locked.
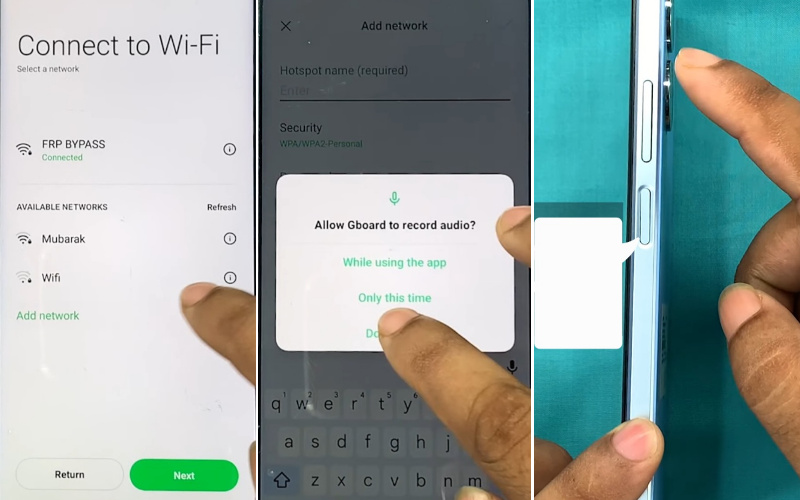
- Step 8: Back to the “Connect Wi-Fi network” page and click “Add network.”
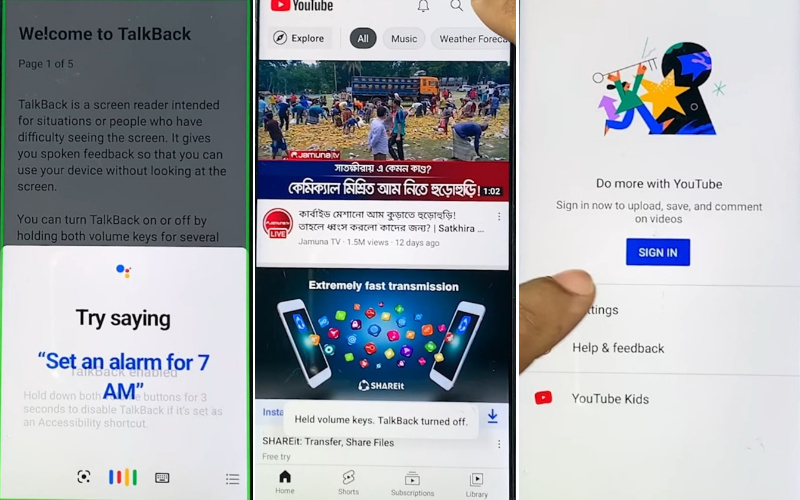
- Step 9: Together press the “Volume down and Volume up” buttons to turn on “Talkback.”
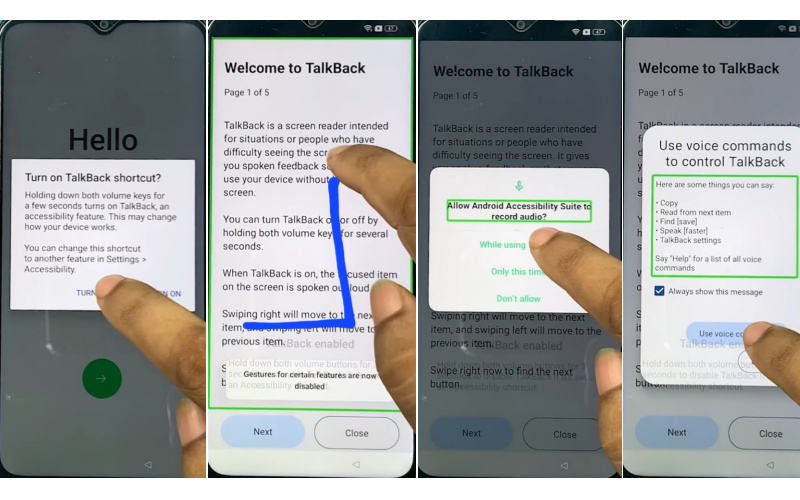
- Step 10: When see the “Turn on TalkBack shortcut data” present here then click the “Turn on” button.
- Step 11: See the “Welcome to TalkBack” page and draw here the “Reverse L.”
- Step 12: In the next step you will see the “Allow Android accessibility suite to record audio” page here click “While using the app.”
- Step 13: Now “Say Google Assistant” with your voice and YouTube.
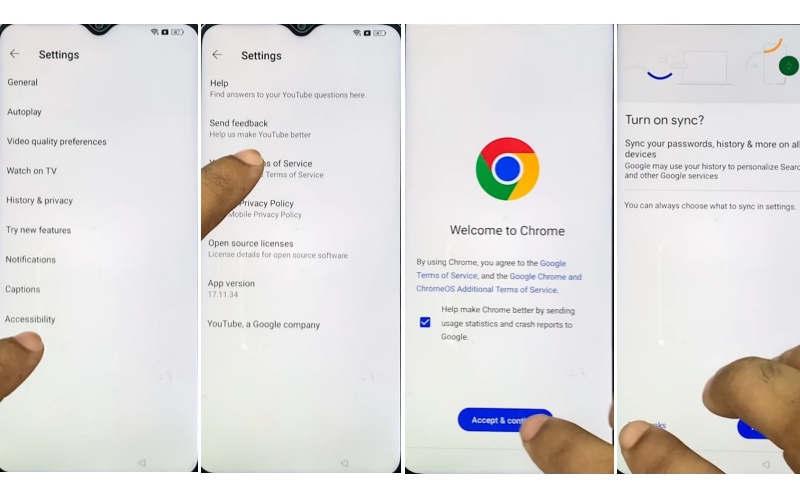
- Step 14: After opening YouTube click on the User icon>Settings>About>YouTube Terms of Service.
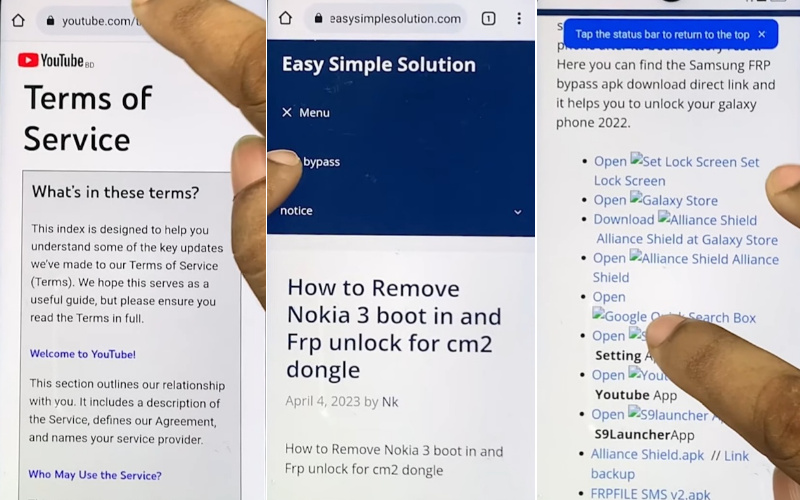
- Step 15: Next, find the Welcome to Chrome>Accept & continue>Turn on sync>No thanks>Youtube search bar.
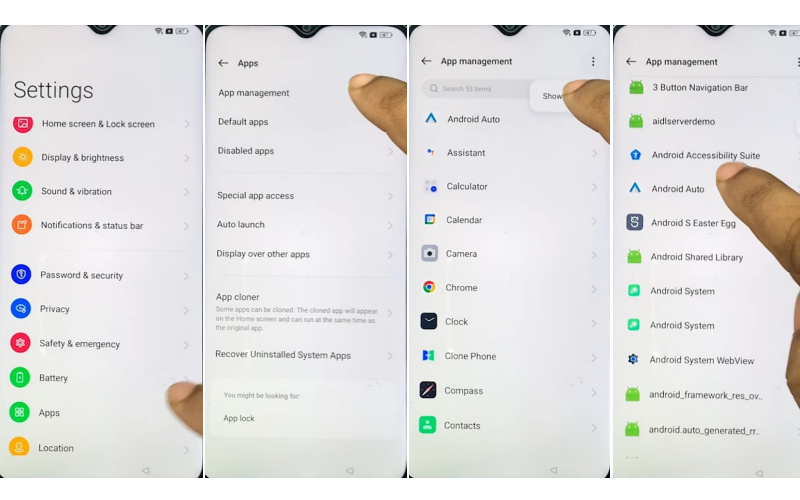
- Step 16: Type “Easy simple solution.com” and open it then go to the “Settings app.”
- Step 17: After getting the Settings app>App>App management>click the three-dot icon>Show system>Android auto. But this method will not work launch a new method.
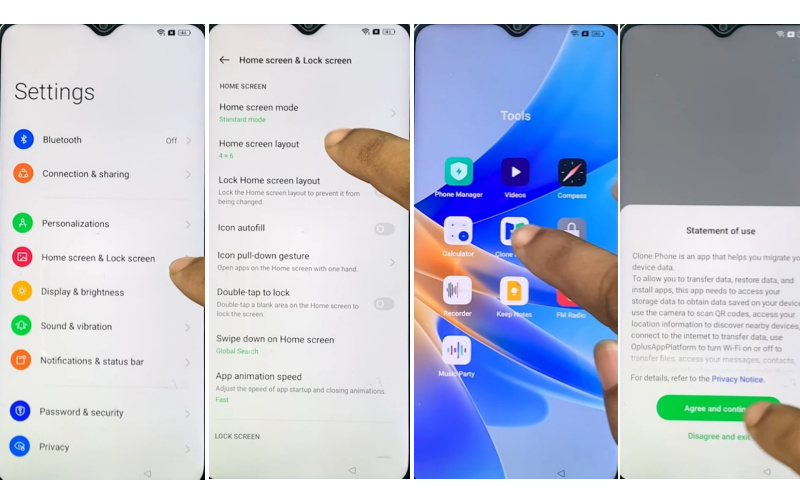
- Step 18: Back to the Settings>Home screen & Lock screen>Home screen layout.
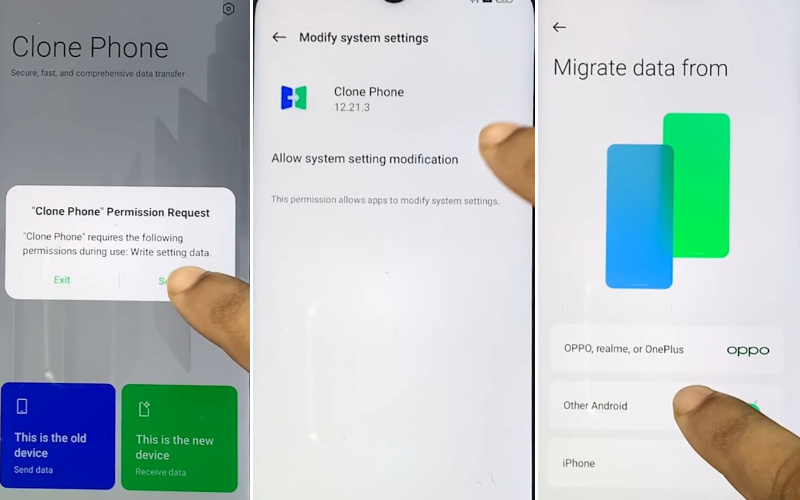
- Step 19: Now open the “Clone phone.apk” then click constantly Agree and Continue>Settings.
- Step 20: Enable the “Allow system setting modification” and click “Setting.” Do this several times.
- Step 21: Click the “Other Android” option then enter with another mobile to connect your devices.
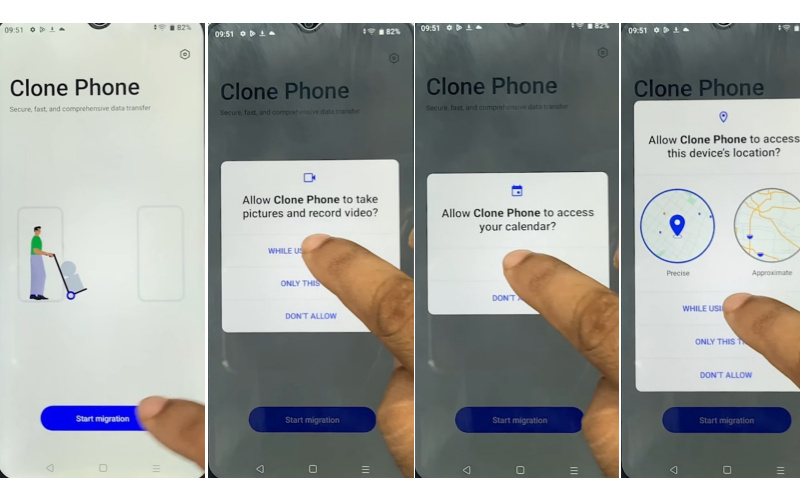
- Step 22: Go to “Other mobile” and open Clone phone.apk>Agree & continue>Start migration>OK>White using the app>click Allow 5 times.
- Step 23: Again here find the “Allow clone phone to access this device’s location” page and click “While using the app.”
- Step 24: Scan the “QR code” with the Connect Oppo phone to “Share any app.”
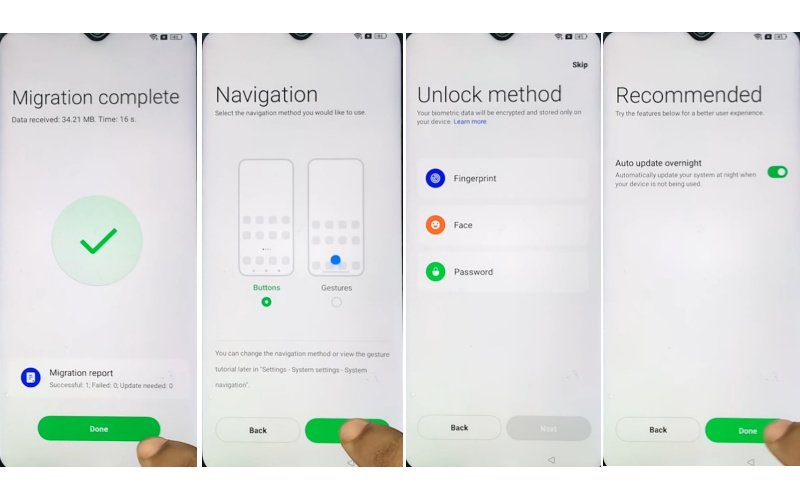
- Step 25: After Migration is complete remove the other phone and go to the oppo phone here click “Done.”
- Step 26: At this stage, you see the Navigation>Buttons>Next>Unlock method>Skip>Recommended>Done.
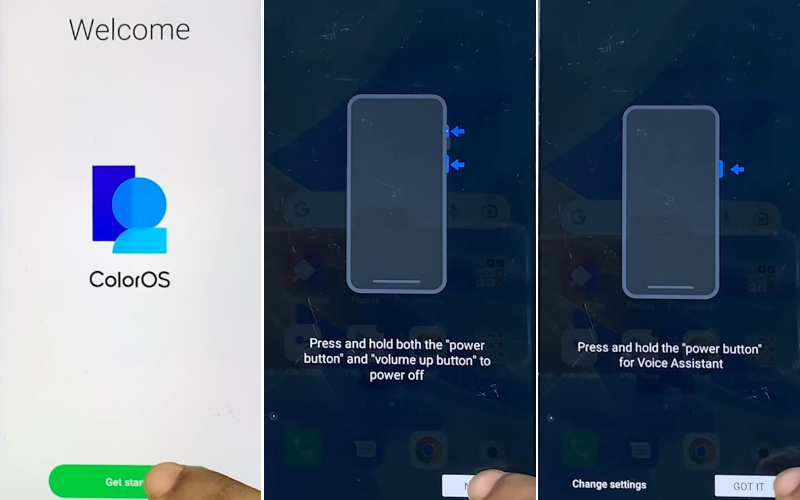
- Step 27: Now find the “Welcome” screen here and click the “Get started” key.
- Step 28: Finally, long press the Power button and tap “Next” and “Got it.”
Congrats! Your bypass Google verification OPPO Find N2 Flip without a computer method is complete successfully.
What is the FRP Lock
The FRP (Factory Reset Protection) lock is like a digital gatekeeper for your smartphone or device. When you set up a new device or perform a factory reset, it ensures that only the rightful owner can access and use the device. Think of it as a security guard that asks for your credentials, like your Google account and password, before granting access. This feature helps deter thieves from resetting a stolen device and makes sure your data stays safe. So, in simple terms, FRP lock is your device’s security buddy.
How to Disable Factory Reset Protection (FRP)
Disabling Factory Reset Protection (FRP) involves some steps to free your device from its digital lock. It’s essential to be cautious because this security feature is there to protect your device and data.
To disable FRP, follow these simple steps:
- First, turn on your device and go to the “Settings” menu.
- Find the “Accounts” or “User & Accounts” section in your device’s settings.
- Tap on your Google account, which is linked to the FRP.
- Look for the option to “Remove” or “Delete” the Google account from your device. Note that this step may require your device password or PIN.
- Confirm that you want to remove the account.
- After removing the Google account, go to the “Backup & Reset” or “System” section of your settings.
- Initiate a factory reset from there. This will erase all data on your device, including the FRP lock.
- Your device will restart, and the FRP lock will be disabled.
Also, be sure to back up any essential data before performing a factory reset because it erases everything on your device.
Bottom Line
We’ve ventured off the beaten path to discover innovative ways to bypass Google verification OPPO Find N2 Flip without the need for a PC. This journey has been all about thinking outside the box and exploring alternative methods. By now, you should have a clear understanding of how to regain access to your device, even when it seems locked behind digital barriers. It’s like finding a hidden treasure in the world of smartphone security. Armed with this knowledge, you can confidently navigate the challenge of bypass Google verification OPPO Find N2 Flip without relying on a PC.