Mobile is an essential item in daily life. Mobile has now become an integral part of people’s lives. And the vital security system of the phone is FRP(Factory Reset Protection). So the security of this virtual device has to be ensured first. Nowadays, all mobile companies prioritize safety in their mobiles.
Similarly, FRP is a critical security measure in mobile security. Why is FRP used, and how to use it? How to Samsung A02 FRP Bypass Without PC? If you don’t know or can’t find the answers to these questions, then I’d say this article is for you.
Here is a detailed discussion about Samsung A02 FRP Bypass Without PC.
What is the FRP Lock
The full name of FRP is Factory Reset Protection. FRP is a system that allows you to reset a forgotten or locked system. For example, the FRP will pop up with the message, “This device was reset.”
Sametime, sign in with a Google account previously synced on this device. Anyway, Factory Reset Protection (FRP) is a built-in security feature designed by Google for smartphones and tablets running Android 5.1.
And later, restrict other people from using your smartphone or tablet if they forcefully perform a factory reset on the phone. So factory reset protection acts as a kind of protection on our smartphones.
Samsung Galaxy A02 Specification:
Samsung A02 smartphone is 6.5 inches, 102.0 cm2 (~81.9% screen-to-body ratio), and has a PLS LCD. The Samsung A02 screen resolution is 720 x 1600 pixels, with a 20:9 ratio (~270 PPI density).
Samsung A02 smartphone photography is good. Have a dual-camera configuration (13MP+2MP) on the rear and a Selfie Single (5MP) camera.
This device packs 64GB/3GB 32GB/4GB internal memory and further microSDXC (dedicated SIM slot). The Samsung A02 smartphone is powered by an Octa-core (4X1.8 GHz Kryo-250 gold & 4X1.8 GHz Kryo-250 Silver) processor.
The Chipset is Mediatek MT6739W (28 nm), and the battery is 5000 mAh non-removable charging system fuels this device. The phone runs Android 10, upgradable to Android 11 and One UI Core 3.1.
How to Disable Factory Reset Protection
To disable the FRP lock, delete the Gmail account. Before unlocking the FRP lock on the smartphone, it is important to know how to disable the Gmail account on the mobile. Yes, this is the simple way to remove the Gmail account. Carefully follow the procedure below to disable the FRP lock. Go to the Settings option =>> Account =>> Gmail id =>> Delete Account =>> that’s ok. That means your FRP is disabled.
Note:
- Before doing the work, back up the necessary images and files on the phone. There is a possibility that your sister’s essential information will be deleted while completing the process.
- Be sure to try to keep your phone charged at 80%-100%.
- Maintain a high-speed internet connection.
- Download the necessary tools and apps.
Read Also: How To Best Way Xiaomi Redmi 7 Mi Account FRP Bypass And Remove File Free?
How To Best Way Samsung A02 FRP Bypass Without PC

Follow the step-by-step process to Samsung A02 FRP Bypass Without PC. Here is the complete task completed in 23 steps.
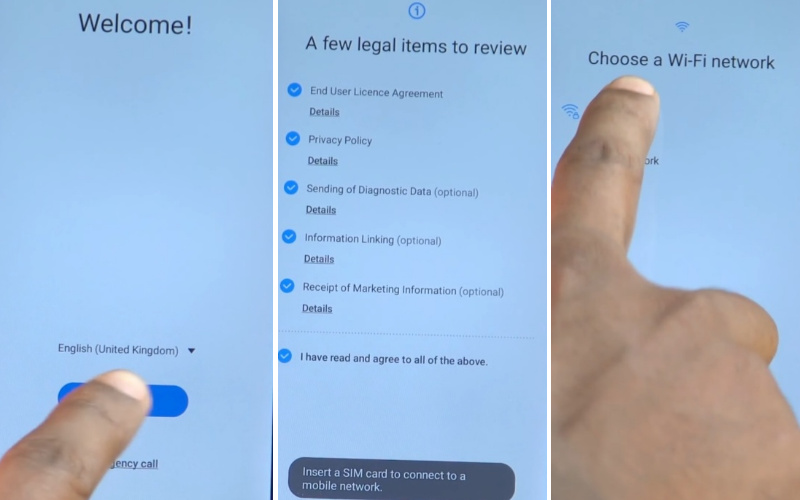
- Step 1: First, turn on your device and go to the “Welcome screen,” then click the “Start” button. Now find the “A few legal items to review” options and click “Next.” Set up your “WiFi connection” option, then click “Next.”
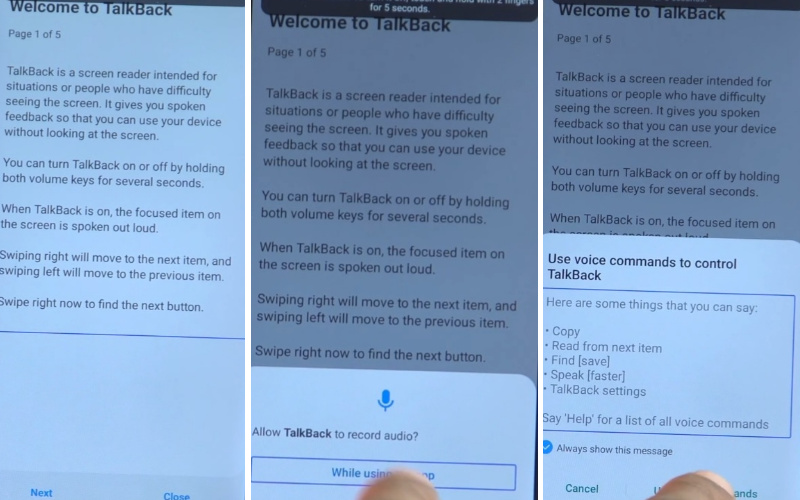
- Step 2: Click on the “Use my Google account instead” option. Then you will see that the “Google verifying your account” page is “locked.” Go to the home screen and press the “Power and Volume up” button for the “TalkBack” option.

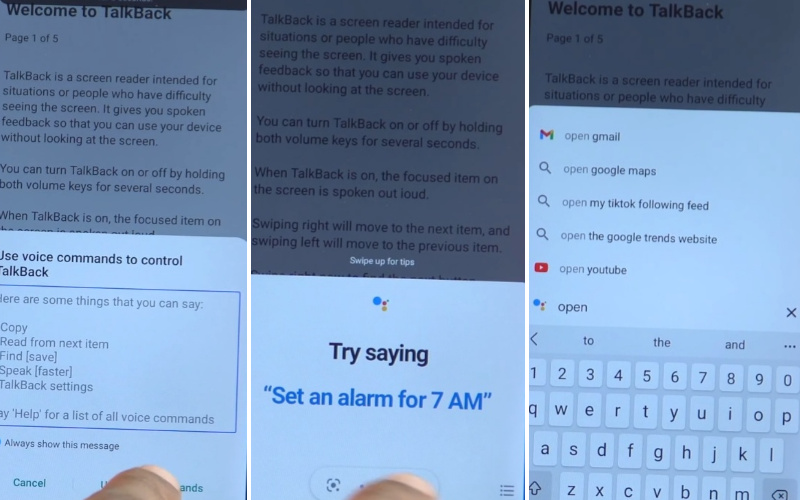
- Step 3: You See the “Welcome to TalkBack” options and draw the “Opposite L.” After finding the “Allow TalkBack to record audio” option, click the “While using the app” button. You will also see the “Use voice commands to control TalkBack” option; click on the “Use voice commands.”
- Step 4: For some moments here, find the “Google Assistant” page, “Say google open youtube.”
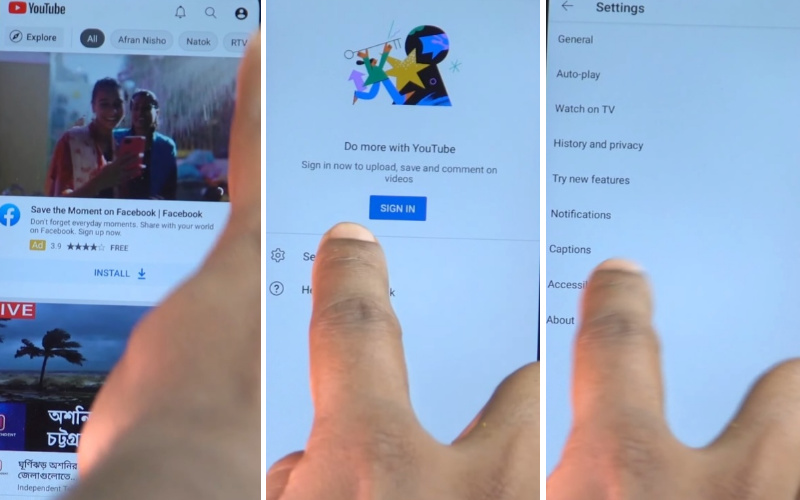
- Step 5: Then click constantly User Icon =>> Settings =>> About.
- Step 6: In these steps, tap on the “Youtube terms of services” options. For a new page called “Welcome to Chrome,” press “Accept and Continue.” Next, you will get the “Turn on sync” option and draw your pattern by pressing the “No Thanks” button.

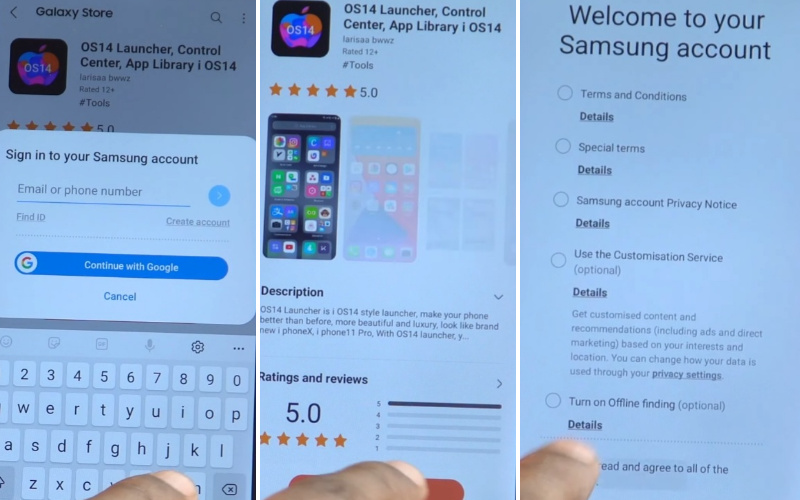
- Step 7: After a while, click on the “Youtube Terms of Service” page; write the “fixfirmware.com/apk” and click it. The “Galaxy Store ” will find and click it. After seeing the “Welcome to the Galaxy Store” option, click the “Agree” and then “Install and Open.”

- Step 8: Find the “Sign in to your Samsung account” option and give your “Gmail and Password.” Then follow the “Welcome to your Samsung account” option with select all, then click the “More and Agree” button. Install and open the “OS14 Launcher control center app library IOS14” apps.
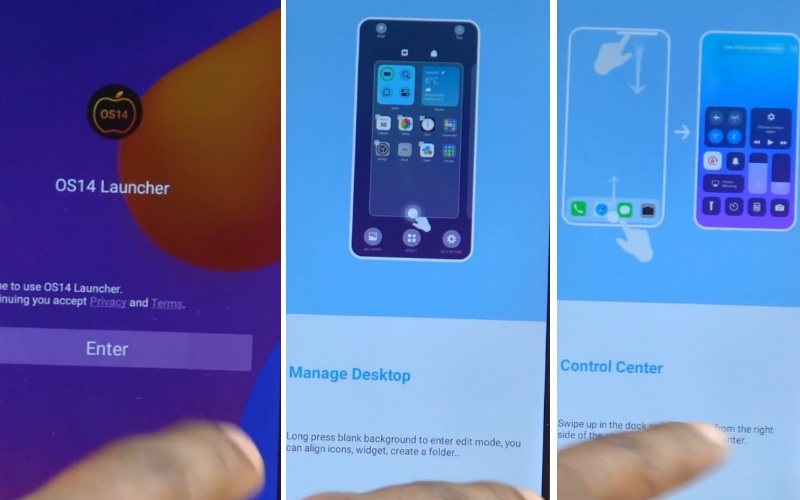
- Step 9: Press the “Enter” option, and follow constantly Manage Desktop=>> Control Center.
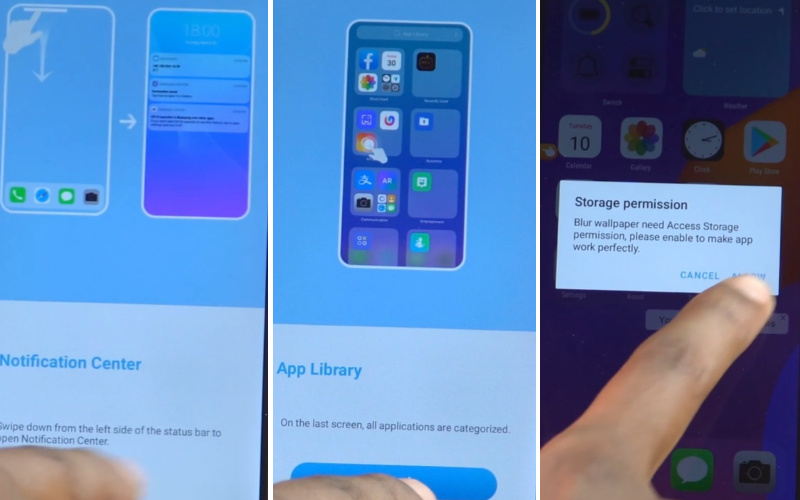
- Step 10: Step by Step click Notification Center =>> App Library =>> Start. At this moment, gets the “Storage Permission” page and click the “Allow” button.
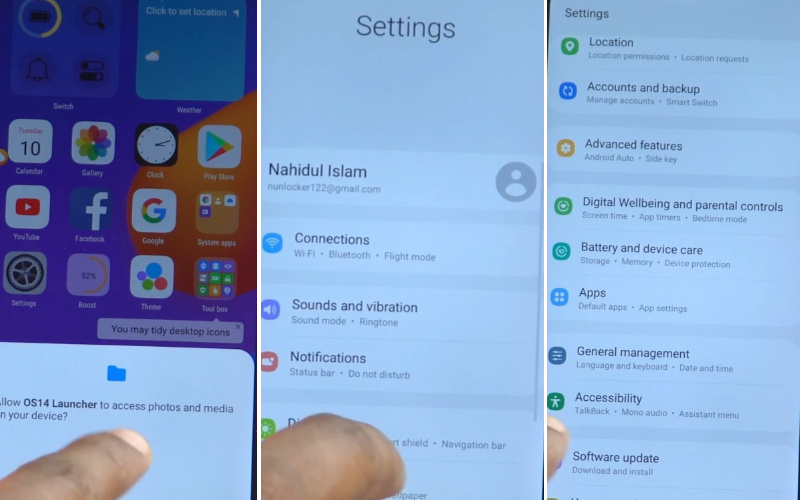
- Step 11: Again, click the “Allow” button and go to the “Settings” options here; select the “Accessibility” button after clicking it.
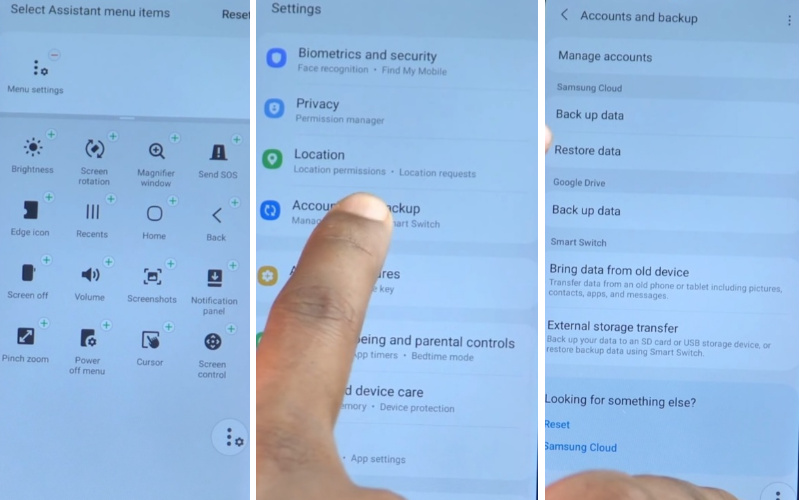
- Step 12: After Constantly clicking “Interaction and dexterity =>> Turn on the Assistant menu and click it =>> Select Assistant menu items.

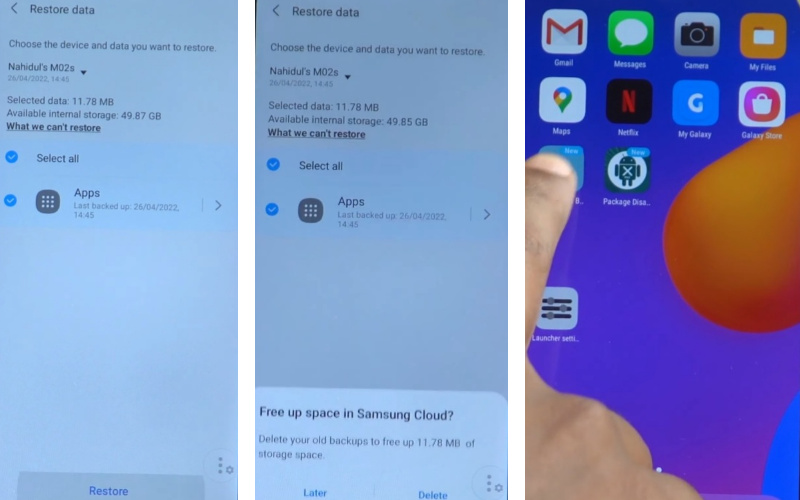
- Step 13: Press on the Menu Settings with the “Accounts and Backup” options and tap it. Next, press “Restore data,” then quickly press “three dots” (same time). If you can’t click perfectly, it asks to update the galaxy store but don’t update, then go back and try again.
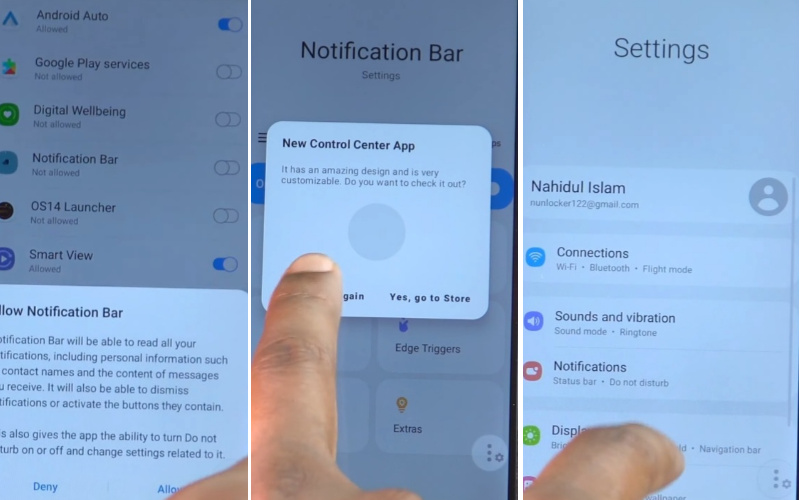
- Step 14: Wait here 6-7 sec, then back if the first time you can’t come here, try again. You will see and click constantly Done=>> Free up space in Samsung cloud=>> Later =>> Notification Bar app.
- Step 15: Keep moving from one step to another step by step Accessibility =>>Installed services.
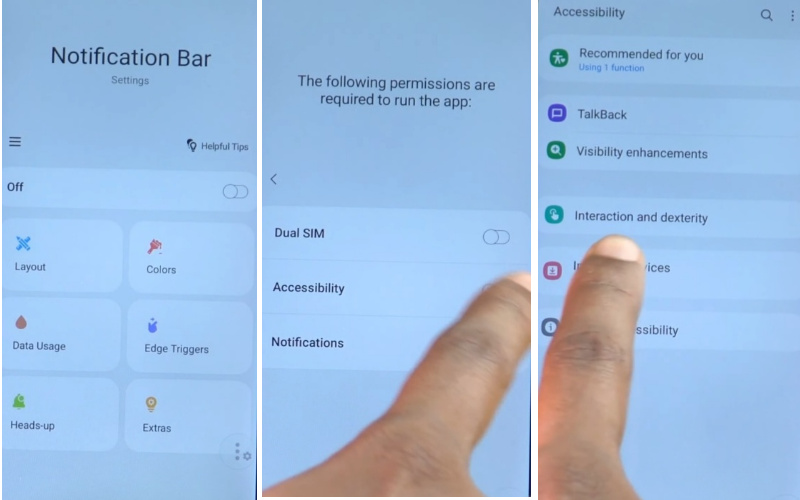
- Step 16: Click Step by Step Notification Bar =>> off =>> Allow Notification Bar to have full control of your phone=>> Allow.
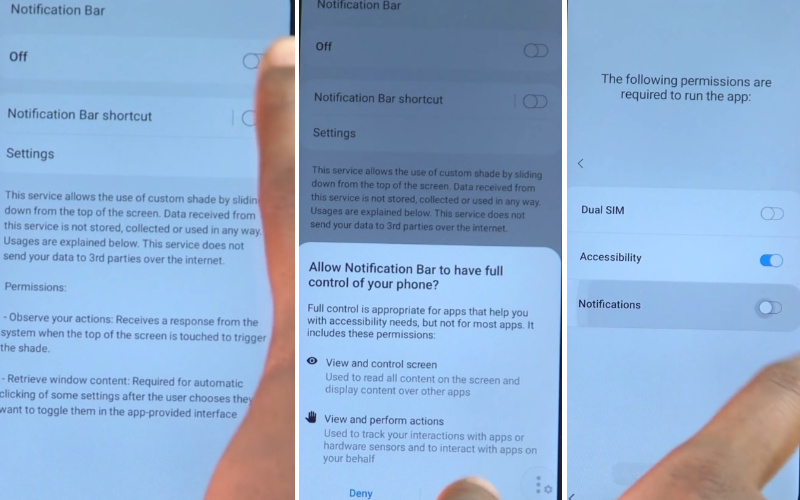
- Step 17: The “Notification Bar app” here click again Notification=>> Notification Bar =>> Allow Notification Bar =>> Allow =>> New control center App =>> don’t show again =>> Settings.
- Step 18: Now close it then go to the Privacy=>> Permission manager =>> File and Midea.
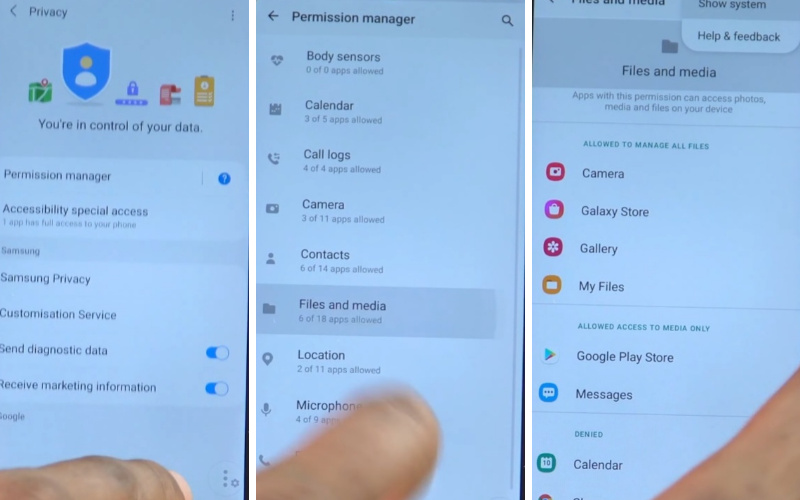
- Step 19: Proceed step by step and tap on the 3 Dots icon =>> Show system=>> Package Disabler Pro =>> Allow management of all files=>> Allow.
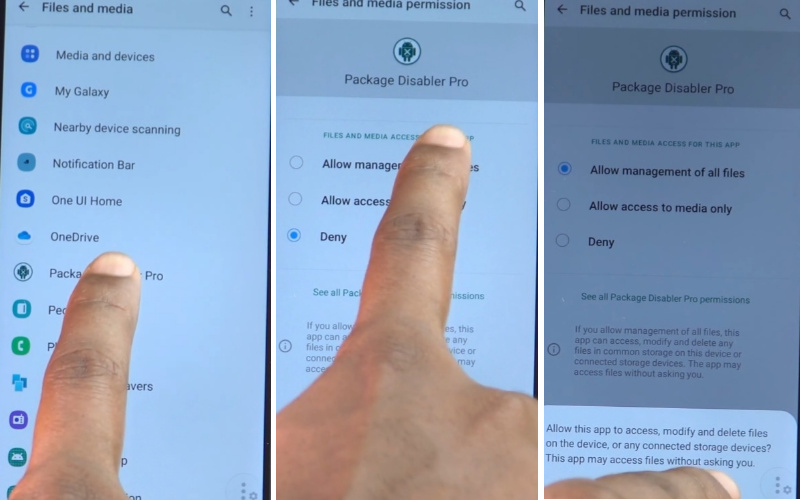
- Step 20: Return to the home screen and click the “Package Disabler Pro” app. This time select “I Agree,” then click “Enable admin” with the “Activate” button.
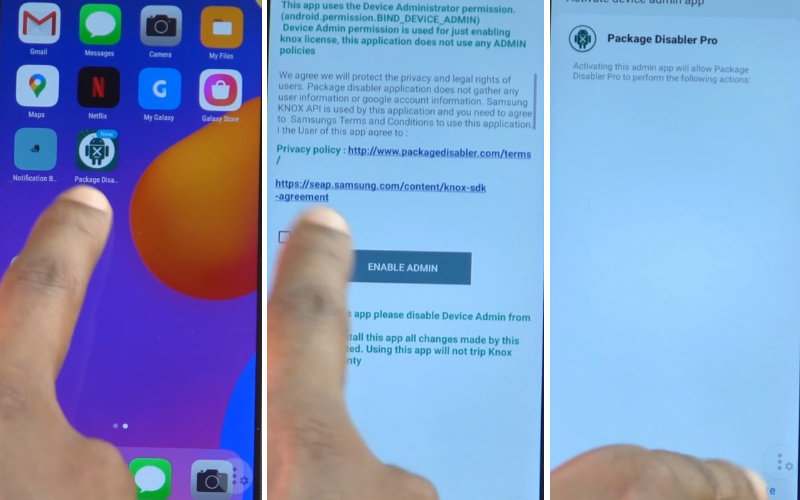
- Step 21: At this moment, find the “KLMS Agent” page and select then press “Agree.” Tap on the Andriod setup =>> Disable.
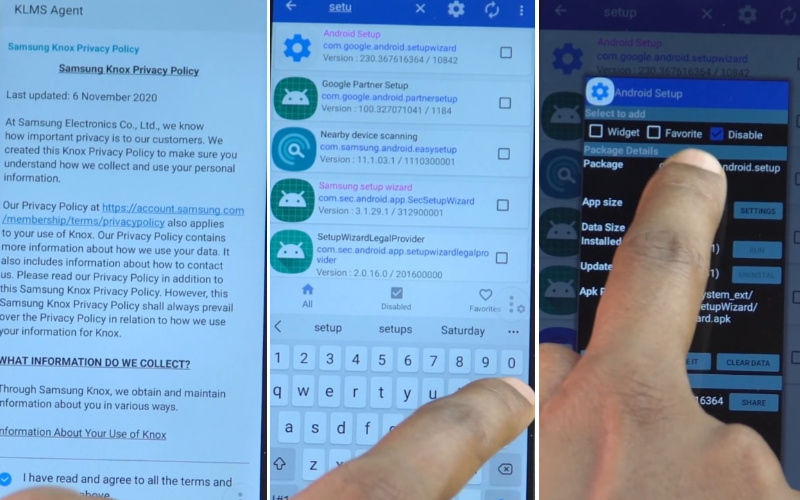
- Step 22: Again same time find the “Samsung setup wizard” option and click “clear data.” You can see the “Get recommended apps” option and click “Next.”
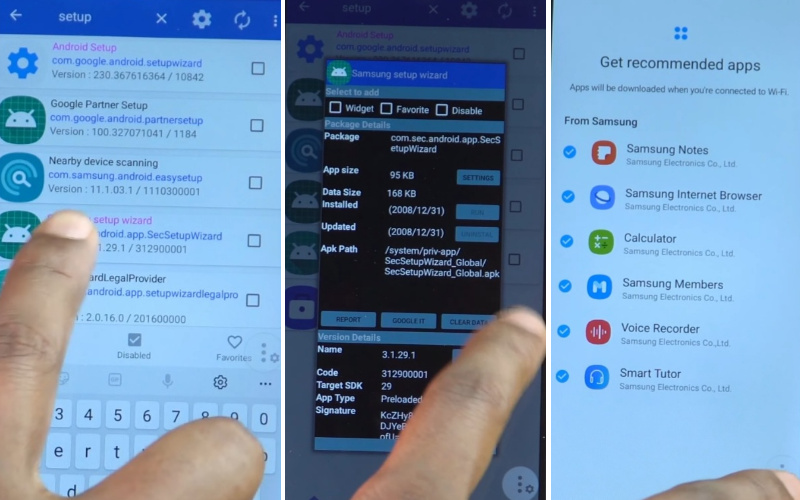
- Step 23: Last moment you will find the “Bring your data from Samsung Cloud” and tap on the “Skip” button. Finally, find the “You’re all set up” option and press the “Finish” button. That means your Samsung A02 FRP Bypass Without PC will be completed successfully.

Final Touch
Friends hope you have solved your Samsung A02 FRP Bypass Without PC from the above discussion. With time and attention, the Samsung A02 FRP Bypass Without PC can be done very quickly.
If there is any problem with understanding, please let us know by mail. Follow the instructions given in the image to complete the process more accessible, and then you will get success.