The smartphone is one of the amazing inventions of science in today’s world. This human communication system has made human life comfortable and accessible after all. Mobile is used by all people. So the security of this important device is the first priority.
FRP (Factory Reset Protection) is a mobile security ring. It plays a significant role in protecting the mobile. Android versions 5.1 to 9 offer FRP built-in. Today we will know what is FRP and how to remove it. Learn more about how to FRP Bypass/Unlock Samsung Galaxy A20 Without PC.
How to Bypass/Unlock FRP Verification Samsung Galaxy A20 Without PC
It acts as a safety belt on the mobile. When the phone is reset, it turns on automatically. And to unlock the FRP lock, you have to use your previous Gmail. Otherwise, it is impossible to open. Of course, you have to go to the phone “Settings” and “Account.”
Samsung Galaxy A20, you can easily complete the FRP bypass/Unlock Samsung Galaxy A20 without PC by going through a few steps. I successfully shared a detailed process to Samsung Galaxy A20 Android V9.0 Pie Bypass/Unlock with Google Verifications.
Samsung Galaxy A20 is the best device at present. High configuration is included in this mobile. So, follow the FRP bypass/unlock Samsung galaxy A20 without PC carefully the solve your problem.
The android FRP solutions and android problems are hard work; if your device faces a problem on the Google Account Verification screen and sees it, you can find all the possible ways to Bypass it.
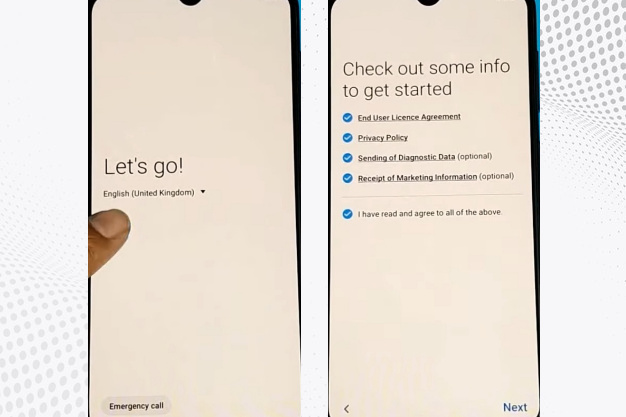
- Step 1:Turn on your “Samsung Galaxy A20” device and go to the “Let s go” screen; then you will get the “Check out some info to get started” page here; select All-time, then click on “Next.”
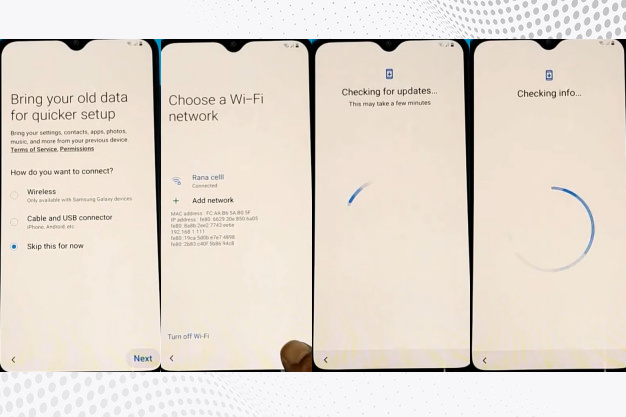
- Step 2: Go to the “Bring your old data for quicker setup” display here to select the “Skip this for now” option, then click on the “Next.” Set up your “WiFi connection” options then you will get the “Checking for updates, checking info” here,s complete automatically.
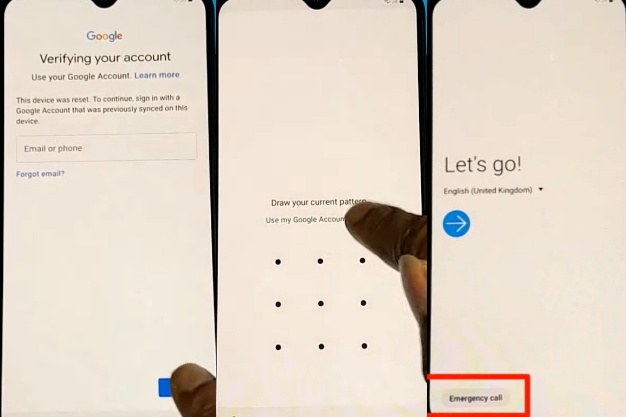
- Step 3: After going to the “Pattern lock” display here, you will find the “Use my Google account instead” option and click it with finding the “Google verifying your account” option. Come back again. “Let s go screen” here, will find the “Emergency call” option and click it.
- Step 4: First, “dial 112” and then “cut.” Again go to the “Let s go,” “Check out some info to get started,” “Bring your old data for a quicker setup,” “Choose a WiFi network” option, and click on the “Add network.” Same time here, find the “Setting icon” and click it.
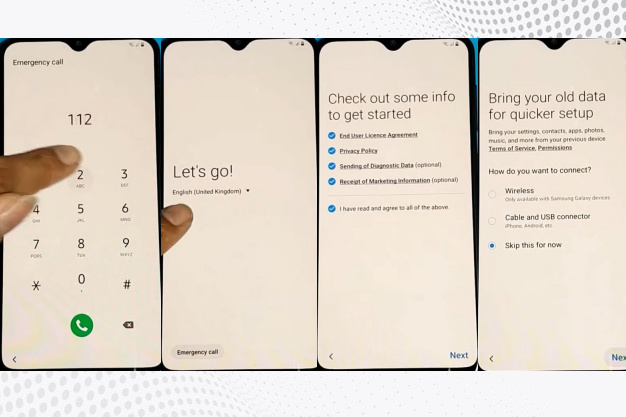
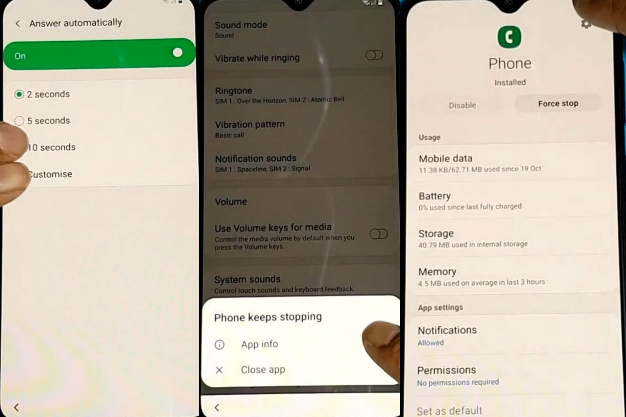
- Step 5: Now click on the “Keyboard layout and feedback” with the “Key tap feedback” option. Same time you will find the “Sound and Vibrate” option and click it. Find the “Answering and ending calls” here; click on the “Answer automatically” option.

- Step 6: You will find the “two, five, ten, customized” options by selecting the two options together. Again go to the “two, five, ten, customized” options by selecting the two options together; here, find the “App info” option and click it. After going to the “Phone” option here, we can see the “Setting” icon and click it.
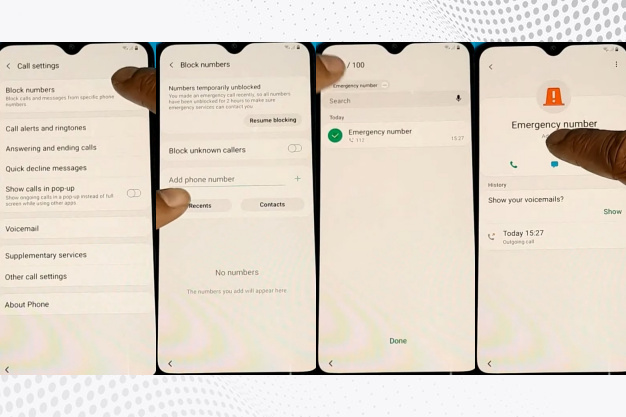
- Step 7: Click on the “Block numbers” to find the “Recent” option, then click it. Select the “Emergency number” and click it. Same time click on the “Message icon” here to find the “3 dot icon” and click it. After you will find the “Add or remove people” option, here give any number and save it with a “Name and Email” after clicking on the “Email icon.”
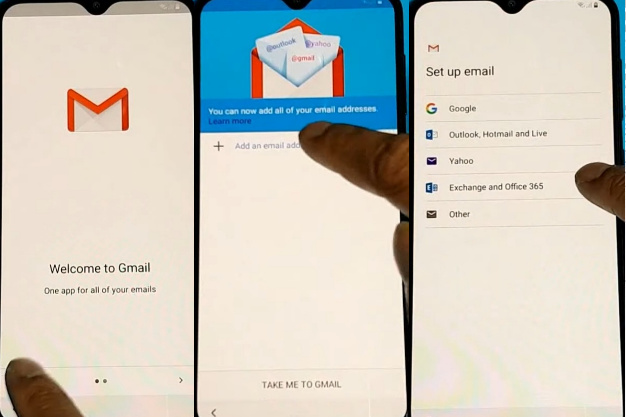
- Step 8: Welcome to “Gmail display” here; click on the “Skip,” then you will find the ” Add your email address” option and click it. Go to the “exchange and office 365“ option giving any “Email address.” here; we can see the “Manual setup” option and click it; after finding the “Exchange,” click it.
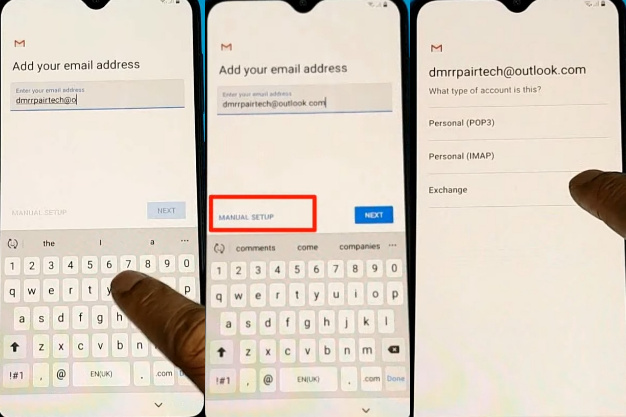
- Step 9: At this moment, you will find the “Email display” here; click on the select option, then go to the “Set secure screen lock type” option and click it. After we can see the “Protect your phone” page here, create a “PIN lock,” then give the “Restart” phone.
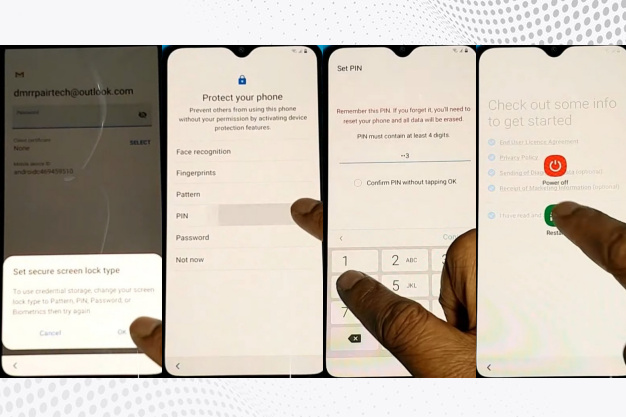
- Step 10: After restarting the mobile, go to “Let.s go”, “Check out some info to get started,” “Bring your old data for a quicker setup,” and “Choose a WiFi network” options, then click on the “Next.” Now give your pin to find the “Google Sign-in” page; click on the “Skip.”
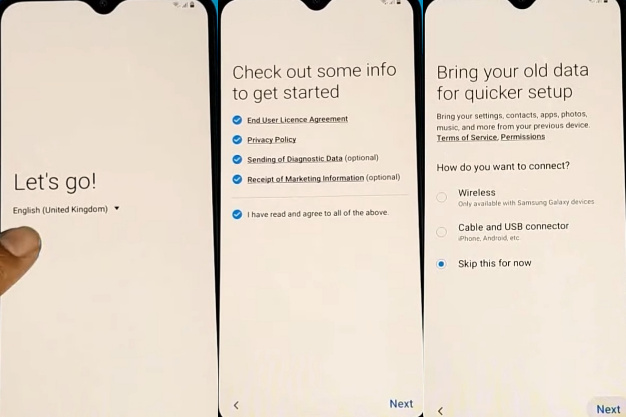
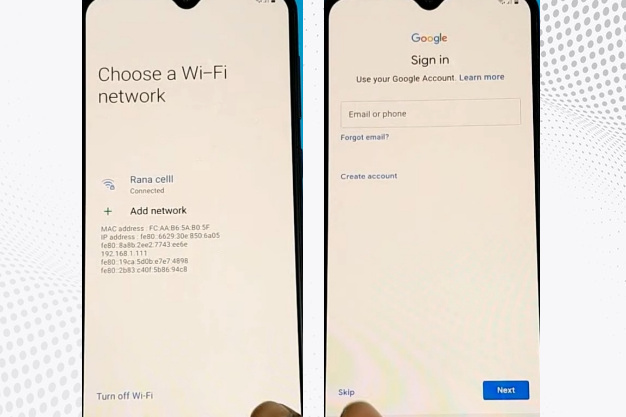
- Step 11: You will find the “Skip account setup” page; here, click on the “Skip” option. Go to the “Date & time” page here and click on “Next.” Again you will find the “Skip account setup” page here; click on the “Skip.” Here you will find the “Google service” page by clicking the “More and Accept.”

- Step 12: Come to the “Review additional apps” option here, click on the “OK” with finding “Adding the finishing touches” it,s complete automatically. Now go to the “Get recommended apps” option; it completes automatically. Then we can see the “Sign in to your Samsung account” option and click on the “Skip.”
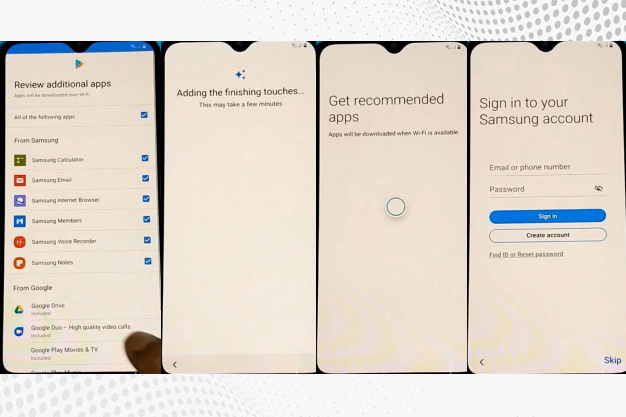
- Step 13: This is the finishing moment; you get the “Skip out on all this” option and click on the “Skip.” Then we can see the “All done” option here; click on the “Finish.”
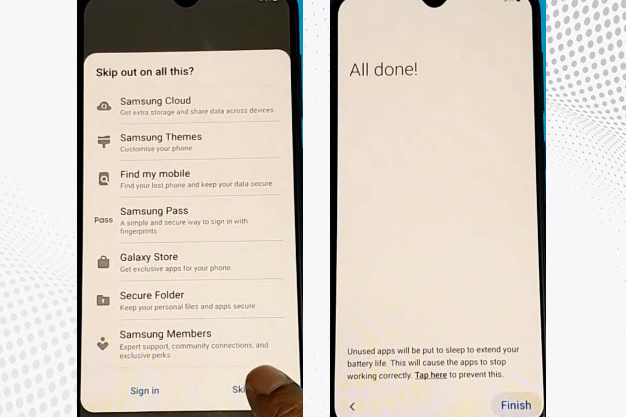
- Step 14: You get a new “Home screen” with “Welcome,” which means your FRP bypass/unlock Samsung Galaxy A20 without PC will be complete. For better work on your device, please “Restart” the first time. Then open it and use it smoothly.
Read Also: How to Bypass/Unlock FRP Samsung Galaxy M30s without PC?
Samsung Galaxy A20 Android V9.0 Pie Specifications
Samsung Galaxy A20 Android V9.0 Pie was first released on 19 March 2019. The display type is very high; it also contains Super AMOLED. Body dimension is 158.4 x 74.7 x 7.8 mm (6.24 x 2.94 x 0.31 in) and weight 169 g (5.96 oz).
Samsung Galaxy A20 Android V9.0 Pie size is 6.4 inches, 100.5 cm2 (~85.0% screen-to-body ratio) and Resolution 720 x 1560 pixels, 19.5:9 ratio (~268 PPI density).
For protection, also use a Glass front (Gorilla Glass 3), plastic back, and plastic frame. Octa-core Octa-core (2×1.6 GHz Cortex-A73 & 6×1.35 GHz Cortex-A53) and Exynos 7884 (14 nm) make it more powerful.
No worries about the memory here; use Card slot microSDXC (dedicated slot) and Internal 32GB 3GB RAM. Samsung Galaxy A20 Android V9.0 Pie the camera is very powerful with quality.
Main the camera is dual 13 MP, f/1.9, 28mm (wide), AF, 5 MP, f/2.2, 12mm (ultrawide) with LED flash and the selfie camera is Single 8 MP, f/2.0. Samsung Galaxy A20 Android V9.0 Pie smart mobile has very powerful.
The battery of Type Li-Po is 4000 mAh, non-removable with fast charging 15W. Which will give you a long-time mobile user experience. Sensors Fingerprint (rear-mounted), accelerometer, gyro, proximity, and compass are other features.
Conclusion
So then it shows how to FRP Bypass/Unlock Samsung Galaxy A20 Without PC. Actually, FRP is a mobile security system. Helps prevent phone use if lost or stolen. The discussion shows how to FRP Bypass/Unlock Samsung Galaxy A20 Without PC step by step. Pictures are used to make the work easier to understand.
Follow the instructions shown in the image step by step. Hope you can solve your phone FRP Bypass/Unlock Samsung Galaxy A20 Without PC quickly. Email us if there is any problem or difficulty in understanding. We are always ready to solve your problem.

